Introduction
How to screenshot on a Dell laptop.com elucidates every straightforward technique for acquiring screen captures and even filming your display on Dell notebooks operating Windows 10 or Windows 11. You will discover rapid whole-display preservations, exact zone acquisitions, current application images, extended page captures, motion picture documentations, and uncomplicated modification strategies—all utilizing native utilities. No supplementary programs required for the majority of operations.
By the conclusion, you will possess assurance in seizing, refining, storing, and distributing screen images on any Dell portable computer. We address Dell-specific keyboard peculiarities, diagnostic advice, storage directories, and occasions when a modest external utility could prove beneficial.
Why Screen Captures Hold Greater Significance in 2026
In 2026, blended professional environments, virtual education sessions, and artificial intelligence instruments render swift visual exchange exceptionally vital.
Visual documentation facilitates superior collaboration across remote teams, enables precise bug reporting in software development cycles, and supports educators sharing annotated materials instantly.
Why Acquiring Screen Images on Dell Notebooks Can Seem Challenging
Dell constructs robust, dependable portable computers, yet keyboard layouts vary across product lines:
- Function key reliance: On numerous Dell Inspiron and Latitude variants, the PrtSc (Print Screen) operates as a secondary capability on the F-row or adjacent to Insert/End. You frequently require Fn + PrtSc or Fn + Windows + PrtSc.
- Variant distinctions: Sleek XPS ultraportables emphasize minimalistic construction, G-Series and Alienware prioritize gaming-oriented keys, and 2-in-1 convertibles incorporate touch-sensitive panels and slate configurations.
- Windows evolutions: Windows 11 refines the Snipping Tool with superior sketching implements, display filming through Windows + Shift + R, and settings to direct the PrtSc button to launch the utility automatically.
- Frequent errors: Many previous instructions overlook the Fn modifier, employ obsolete storage routes, or bypass contemporary native utilities.
Comprehending these minor variations assists you in selecting the appropriate approach in each instance and avoiding “no response” situations. Dell’s keyboard designs often integrate the Print Screen function with other keys to maintain compact layouts, especially on thinner chassis like the XPS series. This design choice, while space-efficient, introduces a learning curve for users transitioning from full-sized external keyboards.
Additional factors include potential conflicts with third-party overlays (such as gaming software on Alienware models), accessibility settings that remap keys, or outdated display drivers on older hardware that fail to register capture commands properly.
Speediest Whole-Display Screen Capture on Dell Notebook (Automatic Preservation)
Ideal for: Rapid acquisitions you wish to store immediately without additional procedures.
Procedures:
- Press the Windows button + PrtSc (or Fn + Windows + PrtSc on many Dell variants).
- Your monitor will briefly darken or blink swiftly to verify the acquisition.
- The screen image is preserved automatically as a PNG document in Pictures > Screenshots.
Dell-Particular Advice: If no action occurs, attempt Fn + Windows + PrtSc or activate Fn Lock. On certain XPS or Latitude configurations, PrtSc occupies space with the Insert or End button. Consult your user handbook or Dell SupportAssist for your precise variant.
Location to locate your captures: Launch File Explorer → This PC → Pictures → Screenshots directory. Documents manifest as “Screenshot (date and time).png”.
This technique functions consistently on both Windows 10 and Windows 11, even within numerous full-screen applications and games.
Traditional Print Screen Button Approaches (Clipboard-Oriented)
These procedures duplicate the visual to your clipboard, enabling you to insert it anywhere—Paint, Word, Teams, electronic mail, or web browsers.
- Complete display: Depress PrtSc (or Fn + PrtSc / Fn + F10 on Dell notebooks). Then insert with Ctrl + V.
- Current window exclusively: Depress Alt + PrtSc (or Fn + Alt + PrtSc). This seizes solely the application you utilize—excellent for tidy program images without background disorder.
For Dell 2-in-1 or slate configuration: Press the physical Windows button + Volume Down.
Following insertion, launch the Photos application or Paint (search via the Start menu) to trim, append lettering, or alter the format. Utilize PNG for crisp clarity or JPG for reduced document dimensions.
Pro Advice for Windows 11: Configure the PrtSc button to launch the Snipping Tool automatically. Navigate to Settings > Accessibility > Keyboard and activate “Use the Print screen key to open screen capture.”
Why Snipping Tool is the Best Option
This represents the preferred utility for most individuals in 2026. It furnishes rectangular, arbitrary shapes, application windows, and complete-display choices, plus immediate refinement.
Procedures:
- Press Windows + Shift + S. The display darkens, and a compact toolbar emerges at the summit.
- Select your mode:
- Rectangular Snip (default): Drag to designate any zone.
- Freeform Snip: Sketch any form desired.
- Window Snip: Click on any active application.
- Full-screen Snip: Acquires everything visible.
- The visual duplicates to your clipboard. A miniature preview emerges in the lower-right corner—select it to access the editor.
- Within the Snipping Tool editor, append text, sketch with the stylus or highlighter, remove mistakes, trim, or revolve. Then preserve, duplicate, or distribute directly.
Windows 11 Improvements: The consolidated Snipping Tool now accommodates display recording. Employ Windows + Shift + R or transition to Record mode inside the application. You can even film with a microphone sound.
Xbox Game Bar for Screen Captures and Display Recordings
Ideal for players on Dell G-Series or Alienware notebooks, yet beneficial for any full-display application or instructional material.
Procedures:
- Press Windows + G to access the Game Bar.
- In the Capture widget, select the camera symbol for a screen image or the record button for a motion picture.
- Rapid screen image shortcut: Windows + Alt + PrtSc (add Fn if necessary on your Dell variant).
Captures and recordings preserve automatically to Videos > Captures. You can modify this directory in Settings > Gaming > Captures.
The Game Bar operates effectively even beyond games and permits recording with microphone sound—convenient for swift instructional videos.
Gamers appreciate the overlay because it works reliably in exclusive full-screen modes where other tools might fail. Background recording options and performance metrics overlays add extra value for content creators analyzing frame rates or system loads during captures. On high-end Alienware models with dedicated GPU switching, ensure the capture targets the correct display output.
Employing the Complete Snipping Tool Application
Search for “Snipping Tool” in the Start menu (it supplanted the prior Snip & Sketch utility).
Key Capabilities in 2026:
- Timed/delayed acquisitions (3, 5, or 10 seconds) — ideal for selections or hints that vanish swiftly.
- Superior annotation implementations, including a ruler in Windows 11.
- Direct preservation choices with selection of PNG, JPG, or additional formats.
- OneDrive integration for automatic cloud safeguarding if activated.
The application also encompasses enhanced video documentation abilities in newer Windows 11 editions.
The full desktop app offers more persistent settings, such as default save locations, theme preferences, and history management. Text extraction (OCR) from images has improved, allowing users to copy text directly from screenshots of documents or web pages—highly useful for research or digitizing printed materials.
Sophisticated Screen Capture Methods
Extended Page Screen Captures
The native Windows Snipping Tool lacks complete support for genuine scrolling acquisitions for lengthy web pages or documents, yet in 2026. For full-page images:
- Utilize Microsoft Edge or Google Chrome native instruments (in Edge: Ctrl + Shift + S → “Capture full page”).
- For greater command, lightweight trusted utilities like ShareX (open-source) furnish seamless scrolling acquisition.
Browser-based full-page capture excels for saving research articles, e-commerce product listings, or lengthy dashboards without stitching multiple images manually. ShareX further extends functionality with OCR, color picking, and customizable workflows.
BIOS/UEFI or Pre-Boot Screen Captures
Some newer Dell models permit depressing PrtSc inside BIOS configuration. On others, simply utilize your mobile phone camera. Always verify your specific variant’s handbook via Dell SupportAssist.
OneDrive Automatic Preservation
If OneDrive is configured, certain acquisitions may safeguard to the cloud automatically. Administer this in OneDrive Settings > Backup.
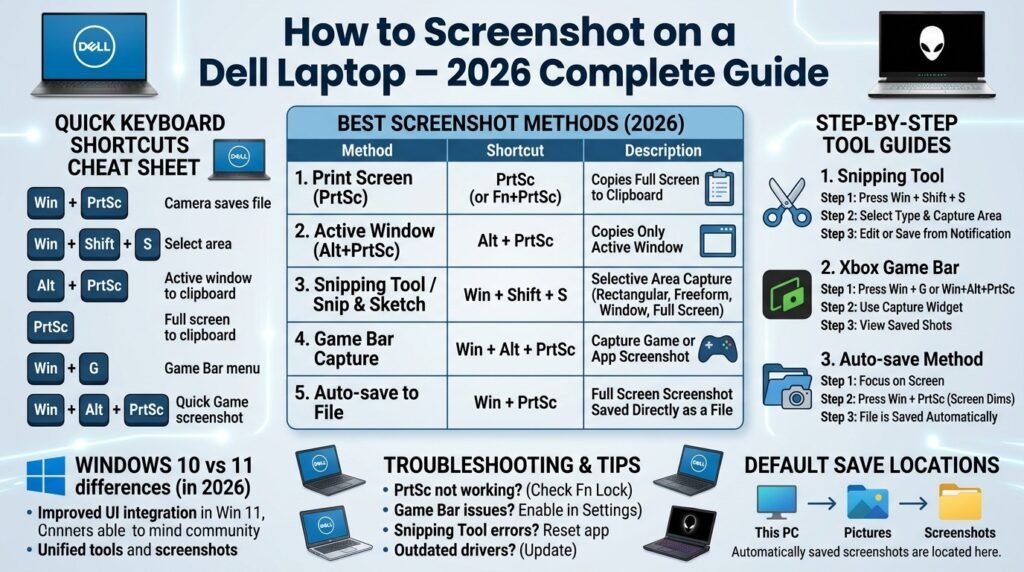
Comparison Table: Screen Capture Methods on Dell Notebooks
| Method | Shortcut | Best For | Saves Automatically? | Editing Options | Windows 10/11 Notes |
| Full-Screen Auto-Save | Win + PrtSc (or Fn + Win + PrtSc) | Quick full captures | Yes (Pictures\Screenshots) | Basic (Paint/Photos) | Screen dims; very reliable |
| Full Screen Clipboard | PrtSc (or Fn + PrtSc) | Pasting anywhere | No (Clipboard) | Full in editor | Fn is often required on Dell |
| Active Window | Alt + PrtSc (or Fn + Alt + PrtSc) | Clean app screenshots | No (Clipboard) | Full | Ignores background clutter |
| Snipping Tool | Win + Shift + S | Precise/custom areas | No (Clipboard + notification) | Excellent built-in | Best overall video in Win 11 |
| Game Bar | Win + G or Win + Alt + PrtSc | Gaming & recordings | Yes (Videos\Captures) | Basic + recording | Great for full-screen apps |
| Tablet/2-in-1 | Windows Button + Volume Down | Touch devices | Yes | Basic | Hardware buttons |
This table simplifies selecting the swiftest approach for your requirements. Additional nuances include performance impact (Game Bar may consume minor resources on lower-spec Inspiron models) and compatibility with multi-monitor setups.
Pros & Cons of Native Dell/Windows Screen Capture Utilities
Pros:
- Entirely cost-free and pre-installed — no downloads or security concerns.
- Keyboard shortcuts grow instinctive after minimal rehearsal.
- Snipping Tool furnishes robust annotation characteristics without supplementary applications.
- Fluid integration with OneDrive, Microsoft programs, and Windows 11 enhancements.
- Native video documentation is incorporated in recent Windows 11 editions.
Cons:
- Absence of true native scrolling screen capture for extremely extended pages.
- The Fn button necessity on many Dell variants bewilders novice users.
- Refinement suffices but falls short of specialized instruments like Snagit.
- Preservation directories vary (Pictures versus Videos), necessitating basic organization practices.
- Infrequent driver or configuration conflicts on aged Dell hardware.
Native tools prioritize security and simplicity, avoiding the privacy risks associated with some third-party screen capture software that may request broad permissions.
Troubleshooting: Why Screen Captures Fail on Your Dell Notebook
“Nothing occurs” ranks as a prevalent complication. Pursue these procedures sequentially:
- Fn Button Difficulties: Attempt Fn + PrtSc or toggle Fn Lock (frequently Fn + Esc). Test by inserting into Notepad initially.
- Display Fails to Darken: The acquisition may still have succeeded—examine your clipboard (Ctrl + V in Paint) or the Screenshots directory.
- PrtSc Launches Snipping Tool Instead: Modify this in Settings > Accessibility > Keyboard.
- Driver Complications: Refresh keyboard and display drivers through Device Manager or execute Dell SupportAssist.
- Interference: Temporarily deactivate OneDrive safeguarding or overlay applications (Discord, antivirus, etc.).
- Variant-Particular Assistance: Search “Your Dell Model + PrtSc not working” on Dell’s official support portal.
- Windows Updates: Confirm your system remains fully updated—newer editions frequently resolve dependability.
If complications persist after updates and Reboots, consider a lightweight open-source utility like ShareX for supplementary features such as OCR text extraction and personalized hotkeys. Always acquire from official origins.
Further diagnostics involve checking for keyboard filter keys or sticky keys enabled accidentally, which can interfere with multi-key combinations. On touch-enabled Dell 2-in-1s, ensure the on-screen keyboard doesn’t conflict with physical inputs.
How to Refine, Preserve, and Arrange Your Screen Captures
Default Preservation Locations:
- Win + PrtSc: Pictures > Screenshots (PNG documents).
- Game Bar: Videos > Captures.
- Snipping Tool: Clipboard initially, then manual preservation (select PNG for optimal clarity).
Rapid Refinement Advice:
- Employ the native Photos application for simple trims and filters.
- Paint or Paint 3D for appending arrows, lettering, or forms.
- Snipping Tool editor for the swiftest markup immediately after acquisition.
Organization Concepts:
- Generate subdirectories inside Pictures: “Professional”, “Education”, “Defects”, “Games”.
- Utilize Windows Search with the term “screenshot” or sort by date.
- Activate OneDrive safeguarding for straightforward access from your smartphone or additional gadgets.
Sharing Optimal Practices: Insert directly with Ctrl + V into electronic mails or documents. Employ PNG when sharp lettering and diagrams matter; transition to JPG for reduced dimensions when distributing online.
Advanced organization might involve tagging files with Windows File Explorer details pane or using PowerToys for enhanced file renaming rules based on capture date and active window title.
Keyboard Shortcuts Cheat Sheet
Retain this roster accessible:
- Full display + automatic preservation: Win + PrtSc (or Fn + Win + PrtSc)
- Full display to clipboard: PrtSc (or Fn + PrtSc)
- Current window: Alt + PrtSc
- Custom snip: Win + Shift + S
- Game Bar screen image: Win + Alt + PrtSc
- Access Game Bar: Win + G
- Display recording (Windows 11): Win + Shift + R
Print or capture this portion for swift consultation near your workspace.
Familiarity with these shortcuts transforms them into muscle memory, significantly boosting daily efficiency for professionals who rely on visual communication.
FAQs
A: Mostly yes, yet Fn combinations and button placement differ by series (Inspiron versus XPS versus Alienware). Test the shortcuts or consult your user handbook and Dell Support for your exact variant.
A: Utilize the physical Windows button + Volume Down, the on-screen keyboard, or Win + Shift + S.
A: Options remain restricted. PrtSc may function in BIOS on newer variants. Otherwise, employ your mobile phone camera.
A: The Game Bar permits altering the location in Settings. For other methods, relocate documents manually or employ simple automation.
A: Windows 11 features a more refined Snipping Tool with enhanced video documentation, a sleeker design, and additional default PrtSc choices. Core shortcuts remain largely unchanged.
Conclusion
Screen captures constitute one of the simplest yet most advantageous instruments for interaction, Diagnostics, and information retention. On Dell notebooks, the combination of Windows + PrtSc for swift preservation and Windows + Shift + S for exact command will manage nearly everything you require in 2026.
Commence rehearsing these shortcuts today—they rapidly become instinctive. Depend on the Snipping Tool for its adaptability and native refinement, particularly on Windows 11. For variant-particular inquiries or persistent complications, Dell’s official support and SupportAssist serve as outstanding complementary assets.
At LaptopDream.com, we strive to deliver lucid, applicable guidance so you extract maximum benefit from your notebook. Whether resolving performance complications, selecting your subsequent device, or investigating fresh Windows capabilities, we exist to assist you in utilizing technology with assurance.