Introduction
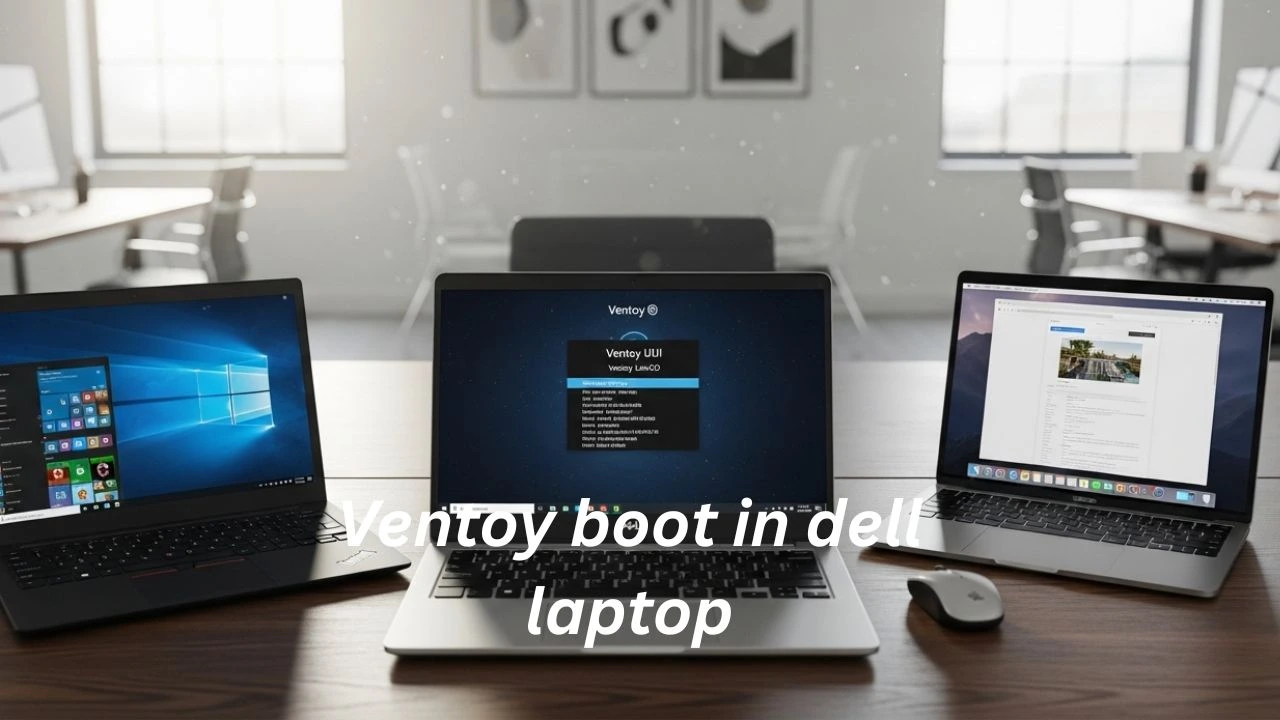
Here’s something different. Ventoy boots in a Dell laptop. One tool skips the usual hassle of making separate USB drives. You install Ventoy, copy your ISO files, plug the USB into your Dell laptop… and nothing happens. No boot menu entry. No USB detection. Sometimes it even jumps straight into SupportAssist Diagnostics as if your USB doesn’t exist.
If this sounds familiar, you’re not alone.
In 2026, Dell laptops will use stricter UEFI firmware rules, aggressive Secure Boot enforcement, and optimized fast-boot pipelines that often block external boot tools like Ventoy silently. The frustrating part? Everything may look correctly set up—but a single hidden BIOS setting can break the entire process.
Common Dell–Ventoy failure symptoms include:
- Ventoy USB not appearing in the boot menu
- Secure Boot silently blocks USB boot
- Dell is loading SupportAssist instead of Ventoy
- Ventoy menu loads, but ISOs refuse to boot
Here’s the truth: Ventoy is not the problem. Dell firmware behavior is. Unlike generic guides, this tutorial focuses specifically on Dell systems, covering the correct BIOS sequence, Secure Boot handling, and real-world fixes that actually work in 2026.
Dell BIOS Updates & Ventoy Compatibility
Recent Dell firmware updates (2024–2026 models like XPS, Latitude, Inspiron) have introduced:
- Stricter Secure Boot key validation
- Faster POST sequences (reducing USB detection window)
- Auto-prioritization of internal drives
Practical insight:
Even if your settings are correct, newer Dell BIOS versions may still skip USB boot unless:
- You press F12 early and repeatedly
- Fast Boot is disabled
- USB is inserted before powering ON
Many technicians now recommend using USB 2.0 ports for better detection stability, especially on newer ultrabooks.
Why Dell Laptops Often Have Boot Challenges
Some Dell laptops utilize updated firmware, along with robust BIOS settings, to safeguard your machine. Though helpful, such protections might make it harder to start up from outside drives – say, one loaded with Ventoy.
| Setting | Default on Dell | Notes |
| Boot Mode | UEFI | Legacy is often hidden or disabled |
| Secure Boot | Enabled | Prevents unsigned loaders |
| Fast Boot | On | May skip USB device initialization |
| USB Boot | Allowed | Sometimes hidden in the boot menu |
Dell quirks to consider:
Plug the USB drive in first, then turn the machine on. Sometimes it needs to be ready ahead of startup.
Starting up quickly might skip checking USB devices completely.
Might be that Secure Boot blocks Ventoy’s keys without the correct setup. Enrollment has to match exactly; access gets denied automatically.
Finding older ISO files could mean needing Legacy BIOS – usually tucked away somewhere in settings.
Finding your way through these small differences matters most when using Ventoy on Dell devices.
Understanding Dell BIOS Modes: UEFI & Legacy
What is UEFI?
A fresh start comes with UEFI, stepping in where the old BIOS used to run things. Faster boots happen because the system initializes more efficiently now. Big storage drives work without trouble, something earlier systems struggled with. Only trusted operating system starters get permission to launch, thanks to a feature called Secure Boot.
What is Legacy BIOS?
Older computers often rely on Legacy BIOS, a longtime standard that supports vintage operating systems along with traditional boot methods. While certain ISO files run more smoothly using Legacy settings, many modern setups demand UEFI instead. Windows and Linux versions today mostly depend on UEFI for installation and startup tasks. This shift reflects how hardware capabilities have evolved.
Why Dell Prefers UEFI
Dell laptops rely on UEFI to enable advanced features:
- Enhanced security via Secure Boot
- Faster boot times
- Support for modern storage standards (GPT partitions)
One thing about Secure Boot: it helps keep systems safe, but sometimes blocks tools such as Ventoy from showing up during startup. Figuring out how these two sides connect makes fixing issues easier.r
Preparing Ventoy USB Drive (Step-by-Step)
Download Ventoy
- Visit the official Ventoy site
- Download the latest stable release.
- Extract the archive to a convenient location.
Install Ventoy on USB
- Insert your USB drive.
- Run the Ventoy installer.
- Select the target USB device.
- Click Install.
Warning: This process erases all data on the USB. Backup important files first.
Copy ISO Files
From the start, Ventoy spots every ISO file when the system boots up. Right away, each one shows on screen without extra steps. As it runs, the listed items appear ready to pick. Once started, detection happens on its own. At launch, no manual work is needed – everything loads into view.
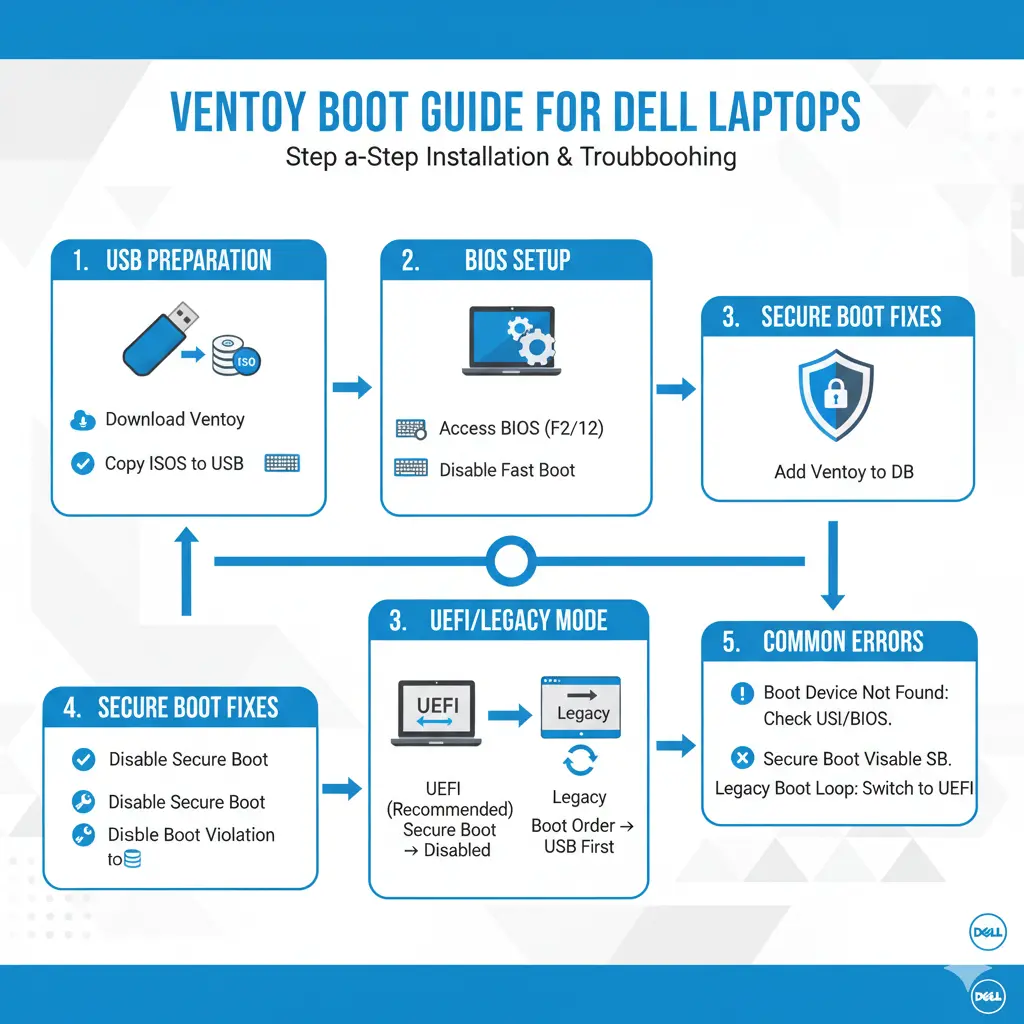
Dell BIOS Configuration for Ventoy Boot
Accessing Dell BIOS
- Power on your Dell laptop.
- Press F2 repeatedly immediately after the Dell logo appears.
Enable USB Boot
Navigate to Boot Configuration → Enable USB Boot to ensure the system checks USB drives during startup.
Disable Fast Boot
Fast Boot accelerates startup but often skips USB initialization. Disable it:
POST Behavior → Fast Boot → Disable
Set Boot Priority
- Move the USB Storage Device to the top of the boot order.
- Save changes and exit BIOS.
Ensure the USB is inserted before powering on, or it may not appear.
Use F12 One-Time Boot Menu
Dell laptops feature a One-Time Boot Menu:
- Restart laptop
- Press F12 repeatedly
- Select your Ventoy USB
If the USB is missing:
- Disable Fast Boot
- Update BIOS firmware
- Reinsert the USB before powering on
Secure Boot & Ventoy: Common Fixes
Dell’s Secure Boot can block unsigned boot loaders. Ventoy supports Secure Boot, but sometimes requires manual key enrollment.
Common Secure Boot Errors
- Failed to Load Image
- Security Policy Violation
- Unauthorized Boot Device
Temporarily Disable Secure Boot
- Enter BIOS (F2)
- Navigate to Secure Boot
- Turn it OFF
- Save and restart, boot Ventoy
- Re-enable Secure Boot after use
Enroll Ventoy Secure Boot Key
Some Dell BIOSs allow key enrollment:
- BIOS → Secure Boot → Key Management
- Select Enroll Key from USB
Note: Not all Dell models reliably support this method.
Frequent Dell + Ventoy Boot Issues & Solutions
| Problem | Solution |
| Ventoy USB is not visible | Insert the USB before powering on, disable Fast Boot, and update the BIOS |
| Laptop boots Dell SupportAssist | Disable Secure Boot, adjust boot order |
| ISO fails to start | Verify ISO integrity, use updated ISO, reinstall Ventoy |
| USB 3.0 not recognized | Use USB 2.0, verify BIOS USB settings |
| “Kernel not found” error | Confirm UEFI ISO compatibility, check ISO checksum |
Example: Booting to SupportAssist
If your system bypasses Ventoy and launches SupportAssist:
Enter BIOS → Boot Order → Move USB to top
Disable Secure Boot temporarily
Reboot with USB inserted.
Best Practices When Using Ventoy on Dell Laptops
- Keep BIOS firmware updated
- Disable Secure Boot before preparing Ventoy
- Prefer USB 2.0 ports for better detection
- Format USB as FAT32 (NTFS may be blocked)
- Test Ventoy on multiple machines
- Always insert the USB before powering on
These practices minimize errors and ensure a smoother multi-boot experience.
Dell Models Compatibility & Considerations
Different Dell lines vary in BIOS menus and Secure Boot behavior:
| Dell Series | Notes |
| Dell XPS | Strict Secure Boot; timing of USB insertion critical |
| Dell Latitude | Supports key enrollment for Secure Boot |
| Dell Inspiron | USB is often hidden under Fast Boot |
| Dell Precision | Works well if the BIOS is updated |
Example: Dell XPS Series
- Secure Boot is strict
- Fast Boot often needs to be disabled
- USB detection improves if inserted before startup
Advanced Tips for Power Users
10.1 Use the Latest Ventoy Version
Ventoy 1.0.100+ improves Secure Boot support and reliability.
10.2 Organize ISO Files
Use folders for clarity:
/Games/
/Tools/
/Linux/
Ventoy scans and lists all ISOs automatically.
Use Ventoy Plugins
- Persistence (save Linux session changes)
- Password protection for sensitive ISOs
- Custom themes for menu personalization
Place plugins in the Ventoy USB folder for automatic detection.
USB Naming for Convenience
Rename your USB:
VENTOY_DELL_BOOT
This helps identify the drive quickly in the F12 menu.
FAQs
A: Yes, by enrolling Ventoy’s signed key or temporarily disabling Secure Boot.
A: Insert the USB before powering on, disable Fast Boot, and update the BIOS.
A: Absolutely. Ventoy only interacts with the USB; it does not alter internal drives unless you explicitly run an installer.
A: Yes, but some Dell BIOSs detect only USB 2.0 during boot. If USB 3.0 fails, switch to a USB 2.0 port.
A: Create folders in the Ventoy USB. Ventoy auto-detects all ISO files during boot.
Pros & Cons of Using Ventoy on Dell
Pros
Multi-ISO support on one USB
Compatible with UEFI & Legacy
Free and open-source
Safe, USB-only booting
Cons
Secure Boot may require extra configuration
USB detection tricky on some BIOSs
Key enrollment can be inconsistent.t
NTFS partitions may not work under UEFI
Best ISO Types for Dell + Ventoy
Not all ISOs behave equally on Dell systems.
Most reliable ISO types:
- Windows 10/11 official ISOs
- Ubuntu, Fedora, Linux Mint
- WinPE-based recovery tools
Problematic ISOs:
- Old Linux distributions
- Modified/custom ISOs
- DOS-based tools
If an ISO fails, always test with a fresh official version first.
Conclusion
Ventoy is one of the most powerful USB boot tools available—but Dell laptops require precision.
The key takeaway is simple:
- Disable Secure Boot (at least temporarily)
- Turn off Fast Boot
- Use the correct BIOS sequence and USB ports
Once these are configured, Ventoy becomes extremely reliable—even across multiple Dell models. If you follow this guide step-by-step, you’ll eliminate boot failures and create a stable, reusable multiboot system for years to come.