Introduction
These days, “how to screen record on HP laptop” grabbing what’s onyourscreen mattersmorethaneverfor peopleusinglaptops. If you’re creating a video for YouTube, teaching a class online, demonstrating how an app works, preserving game highlights, or guiding someone through computer steps, being able to capture your Display helps things move faster and more clearly. For HP laptop owners, having that skill tucked away makes a real difference when getting work done.
Picture this: showing beats, telling most of the time. What you see live can be saved straight from your screen, frame by frame. That moment gets passed along, clear as day, without confusing anyone. Watching someone do it? Often clicks faster than reading how.
Luckily for HP laptop users on Windows 10 or 11, capturing the screen comes naturally- no downloads are needed. Built right into the system are handy options that streamline recording tasks. These tools sit ready to go, so there’s no need to search elsewhere. With them in place, getting a clip of what’s happening onscreen takes little effort. Everything required is already waiting inside the machine you’re using.
Explanation
Folks often think that grabbing a complex app is necessary for screen capture – yet, built right into Windows, are tools strong enough for nearly any recording job. These features work quietly, doing the heavy lifting without fuss.
Still, the majority of people are familiar only with the basic shortcut
Windows + Alt + R
Because of this, they often miss important recording features such as:
- Recording internal system audio
- Capturing microphone commentary
- Selecting specific recording regions
- Locating saved recordings
- Fixing recording problems
- Enhancing video clarity
- Adjusting recording performance
This comprehensive walkthrough covers every detail of capturing screen activity on an HP laptop, starting with basic approaches and then moving into expert-level strategies. A different method is presented in each section, gradually building skills without assuming prior knowledge. Each part connects naturally, using shifts in pace to maintain flow while explaining tools, settings, and timing choices. You’ll see how adjustments affect output, why certain formats matter, and when to change resolution for clarity. The progression feels like peeling layers, revealing finer points only after the core ideas have settled.
In this guide, you will learn:
- Multiple methods to screen record on an HP laptop
- How to record with a microphone and system audio
- The best screen recording software for Windows
- Keyboard shortcuts for faster recording
- Troubleshooting fixes when recording fails
- Tips for high-quality 1080p recordings
- For learners, workers, or people who make material, this way works well
Once you finish reading, it’ll be obvious which way to record your screen fits what you’re trying to do – be that fast clips, step-by-step guides, or polished footage. How each option lines up with your goal becomes clear along the way.
Can You Screen Record on an HP Laptop?
Fans of HP gear will find most current models ready to capture what happens onscreen—especially if they run either Windows 10 or the newer Windows 11 version.
Fans of built-in tools will find that Microsoft has already packed Windows with ways to record what happens on the screen. No extra software needed – everything runs straight from the system. Some shortcuts trigger captures, others start clips automatically. Built right in, these functions work whether you’re showing a process or saving gameplay moments.
Folks just starting can record their screen without hassle, thanks to tools already built into the system. These features eliminate the guesswork, providing a seamless way to capture what’s on display.
Built-in Screen Recording Tools in Windows
| Screen Recording Tool | Built-in | Best For |
| Xbox Game Bar | Yes | Quick recordings |
| Snipping Tool (Windows 11) | Yes | Partial screen recording |
| PowerPoint Screen Recorder | Yes | Presentation recording |
| OBS Studio | No | Professional recording |
| Online Screen Recorders | No | Browser recording |
One thing works one way, another does something else based on what you aim to capture.
For example:
- For fast clips and grabbing gameplay, Xbox Game Bar works just right.
- A section of the screen can be captured using Snipping Tool. What you see gets saved by selecting just that part. Picking an area means that it only appears in the result. The tool works on whatever piece you choose to frame. Capture happens once the zone is set.
- Slides play smoothly when recorded, making them ideal for lessons or work presentations—a quiet tool doing its job without fuss during demos.
- From scene transitions to audio mixing, OBS Studio handles what creators need. A solid choice emerges when detail matters during capture sessions. Professionals rely on its flexibility behind the scenes.
Later on, one approach at a time is broken down, helping you land on what fits. How things unfold depends on which path makes sense. Each piece reveals itself slowly, without rushing ahead.
Screen Record Using Xbox Game Bar
Right there on your HP laptop lies a quiet tool – the Xbox Game Bar – for capturing screen moments quickly. Built into Windows, it appears without requiring downloads or setup steps.
What started as a way for players to save their moves now grabs all kinds of on-screen action. Over time, it grew beyond just gaming moments. Today, it handles many types of recordings. Its job changed, but its core stayed the same. No longer limited, it works for various needs. From one purpose came broader uses. Simple roots led to a wider reach.
You can use Xbox Game Bar to record:
- Applications
- Browser windows
- Software demonstrations
- Online classes
- Video meetings
- Gaming sessions
- Tutorial walkthroughs
With this tool, you can capture what your mic picks up, along with sounds playing on the device. Perfect for discussing ideas while showing screen activity.
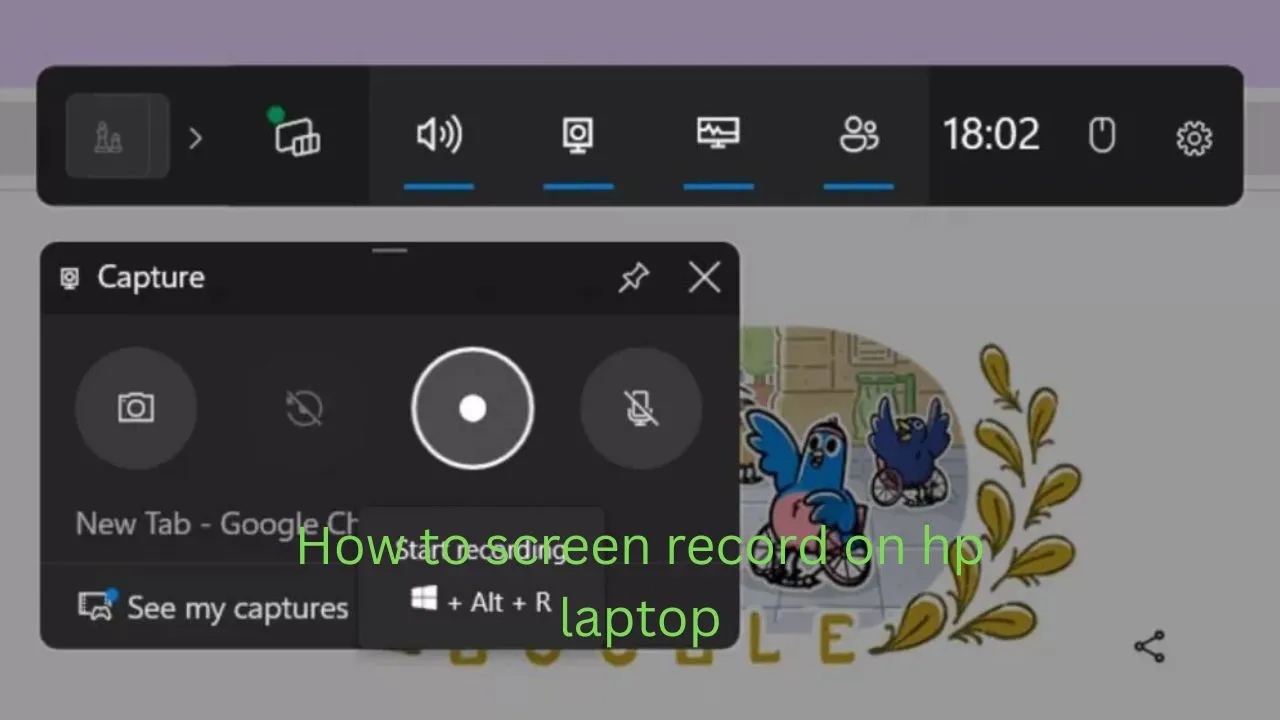
Step-by-Step Guide to Recording Screen Using Xbox Game Bar
Open Game Bar
Hit those keys together fast
Windows + G
A small window might pop up across whatever you’re doing. It floats right on top of your current view.
Open the Capture Widget
Right there on top, find the Capture tool. It sits inside the floating panel.
If you cannot see it:
Click Widgets → Capture
From here, recording gets managed. Control lives in this section. Adjust settings through these options. The tools sit ready, waiting. Operating happens right on this screen. Managing what’s recorded works via these controls.
Start Recording
Press down on the round button to start recording.
Faster than a blink, your screen recording starts. Right now, it’s already saving what you see.
Perform the Activity
Now perform whatever action you want to record.
Examples include:
- Opening applications
- Demonstrating software features
- Recording a tutorial
- Playing a game
- Showing website navigation
Stop Recording
To stop recording, press:
Windows + Alt + R
Your recording will automatically be saved.
Where Are Xbox Game Bar Recordings Saved?
By default, Windows stores recordings in the following location:
This PC → Videos → Captures
You can easily find your recorded files using File Explorer.
Advantages of Xbox Game Bar
- Built directly into Windows
- No additional software required
- Simple and beginner-friendly interface
- Supports microphone recording
- Fast keyboard shortcuts
- Suitable for most applications
Limitations of Xbox Game Bar
Despite its convenience, Game Bar has a few restrictions.
- Cannot record the desktop or File Explorer
- Limited editing capabilities
- Basic configuration options
- Not ideal for professional video production
If you require more advanced features, other recording tools may be a better fit.
Record Screen Using Snipping Tool (Windows 11)
Windows 11 introduced a major upgrade to the Snipping Tool by adding video recording functionality.
Previously used only for screenshots, the tool now allows users to capture specific screen areas as video clips.
This makes it extremely useful for short recordings and quick demonstrations.
Best Uses of Snipping Tool Recording
- Recording only part of the screen
- Capturing browser tutorials
- Recording bug reports
- Creating quick explanation videos
- Demonstrating small tasks
Steps to Record Screen Using Snipping Tool
Open the Snipping Tool
Click the Start Menu and search for:
Snipping Tool
Launch the application.
Select Record Mode
Inside the tool, click the Record icon.
Start New Recording
Click New Recording.
Select Recording Area
Use your mouse to drag and select the screen region you want to record.
Start Recording
Click Start, and the recording will begin.
Advantages of Snipping Tool Recording
- Perfect for recording a specific section of the screen
- Extremely simple to operate
- No installation required
- Ideal for short tutorials
Limitations
- Limited audio recording support
- Not suitable for long recordings
- Lacks advanced editing tools
Record Screen Using PowerPoint
Many users are unaware that Microsoft PowerPoint includes a built-in screen recorder.
This hidden feature is especially useful for creating training videos and educational presentations.
Best Uses of PowerPoint Screen Recording
- Training videos
- Online courses
- Educational demonstrations
- Business presentations
- Software tutorials
Steps to Record Screen Using PowerPoint
Open PowerPoint
Launch Microsoft PowerPoint.
Go to Insert
Click:
Insert → Screen Recording
Select Recording Area
Choose the portion of the screen you want to capture.
Start Recording
Click the Record button.
PowerPoint will begin recording your screen.
Stop Recording
When finished, stop the recording.
The video will automatically appear on your slide.
Export the Recording as a Video
To save the recording as a video file:
Go to:
File → Export → Create Video
You can now share or upload the video.
Record Screen Using OBS Studio (Professional Method)
If you want professional-level screen recording, OBS Studio is one of the most powerful free tools available.
OBS is widely used by:
- YouTubers
- Streamers
- Online educators
- Software developers
- Content creators
It offers extensive recording features that far exceed those of built-in Windows tools.
Key Features of OBS Studio
- Record in 1080p or 4K resolution
- Capture the entire screen
- Record webcam and microphone
- Advanced audio mixing
- Multiple recording scenes
- Live streaming support
- Professional video quality
How to Record Screen Using OBS Studio
Download OBS Studio
Download the software from the official website.
Install the Software
Run the installer and follow the setup process to complete the installation.
Open OBS Studio
Launch the program.
Add Screen Source
Click + under Sources
Select:
Display Capture
Start Recording
Click Start Recording.
OBS will capture your entire screen.
Why Professionals Use OBS
OBS Studio offers major advantages:
- Professional recording quality
- Advanced customization options
- Multi-source recording
- Powerful audio control
- Completely free and open source
If you want YouTube-quality screen recordings, OBS Studio is the best solution.
Online Screen Recorders (No Software Installation)
Online screen recorders enable you to record directly from your browser without the need to install software.
These tools are ideal for quick recordings.
Popular Online Screen Recording Tools
- Loom
- Tella
- EaseUS Online Screen Recorder
Advantages
- No installation required
- Works in any browser
- Easy sharing links
- Beginner friendly
Limitations
- Requires an internet connection
- Free versions have recording limits
- Some tools add watermarks
How to Screen Record on an HP Laptop With Sound
Recording audio is essential for tutorials, presentations, and explanations.
There are two main types of audio that can be recorded.
| Audio Type | Description |
| System Audio | Sound from apps, videos, or games |
| Microphone Audio | Voice commentary |
Enable Audio in Xbox Game Bar
Follow these steps:
- Press Windows + G
- Open Audio Settings
- Select your microphone device
- Enable system sound recording
Your recordings will now include both microphone commentary and internal system audio.
HP Laptop Screen Recording Shortcuts
Keyboard shortcuts allow faster recording.
| Action | Shortcut |
| Open Game Bar | Windows + G |
| Start Recording | Windows + Alt + R |
| Stop Recording | Windows + Alt + R |
| Take Screenshot | Windows + Alt + PrtSc |
Where Are Screen Recordings Saved?
Many users struggle to find their recorded videos.
Default Windows Location
Your recordings are stored here:
This PC → Videos → Captures
OBS Recording Location
OBS recordings are saved in the folder configured in settings.
You can change this location anytime.
Best Screen Recording Software for HP Laptops
| Software | Best For | Free Version |
| OBS Studio | Professional recording | Yes |
| Bandicam | Gameplay recording | Yes |
| Camtasia | Tutorials and editing | No |
| Xbox Game Bar | Built-in recording | Yes |
Quick Recommendations
Beginners: Xbox Game Bar
Professionals: OBS Studio
Tutorial Creators: Camtasia
Pros and Cons of Screen Recording on HP Laptops
Pros
- Built-in recording tools available
- No additional software required
- Easy keyboard shortcuts
- Supports microphone recording
- Multiple recording methods
Cons
- Built-in tools have limited editing
- Game Bar cannot record the desktop
- Some tools require installation
Common Problems When Screen Recording (And Fixes)
| Problem | Solution |
| Game Bar not opening | Enable it in Windows Settings |
| No audio recording | Check microphone permissions |
| Black screen recording | Update GPU drivers |
| Recording not saved | Check Captures folder |
| Recording lag | Close background apps |

Best Screen Recording Method for Different Users
| User Type | Best Method |
| Students | Xbox Game Bar |
| Teachers | PowerPoint Recorder |
| Content Creators | OBS Studio |
| Developers | OBS Studio |
| Casual Users | Snipping Tool |
FAQs
A: You can record your HP laptop screen with sound using Xbox Game Bar. Press Windows + G, enable microphone audio, and start recording.
A: The shortcut is:
Windows + Alt + R
This starts or stops recording using Xbox Game Bar.
A: Yes. Windows includes built-in tools such as:
Xbox Game Bar
Snipping Tool
PowerPoint screen recorder
These allow for screen recording without the need to install additional software.
A: Yes. The Snipping Tool in Windows 11 allows recording a selected area of the screen.
A: This usually happens due to GPU driver issues or hardware acceleration conflicts. Updating graphics drivers often fixes the problem.
Conclusion
Learning how to screen record on an HP Laptop is extremely useful for students, professionals, teachers, and content creators.
Fortunately, Windows provides several powerful recording options that make screen capture simple and accessible.