Introduction
Turning on a Dell Laptop isn’t just about clicking the switch – even seasoned users might pause. For newcomers, it feels unclear; others still stumble now and then. Getting through initial login, setting up Windows properly the first time, spotting common start-up hiccups, then fine-tuning how fast it wakes takes real clarity.
It moves beyond just switching them on, covering early stages such as entering BIOS settings. From there, it followsthe steps involved in loading an operating system. When problems arise during booting, the path explains what causes startup loops. Speed matters too – so it touches on ways to speed up boot times. Over time, knowing these details becomes key to fixing hiccups and keeping machines running smoothly. Confidence comes not from guessing but from understanding each layer involved in turning these devices on.
Dell Laptop Startup Basics name
Prior to turning on your Dell computer, it is very important to understand the process Dell uses to power on the machine. Once you understand each of the phases, you will have a far better idea of what could go wrong and why. This is important when troubleshooting, as it allows you to pinpoint specific areas for attention.
Key Phases of Dell Laptop Startup
| Step | Description |
| Power On | Electrical current flows into the laptop, initiating the hardware components. |
| BIOS POST | The system conducts a Power-On Self-Test (POST), verifying CPU, RAM, storage, keyboard, and other components. |
| Operating System Load | The login screen appears, and the system is fully operational. |
| Ready to Use | Login screen appears, and the system is fully operational. |
Essential Precautions
- Use official Dell adapters only to prevent hardware damage.
- Ensure the battery is charged or the laptop is plugged in during startup.
- Disconnect external devices (USB drives, printers, external monitors) to avoid conflicts during boot.
Pro Tip
Allow 5–10 minutes to charge before trying to turn it on. A completely drained battery can also cause some issues on certain systems. This includes some Dell systems that may not power on right away after being completely drained.
How to Start a Dell Laptop Name
Follow this sequence to guarantee a smooth startup experience.
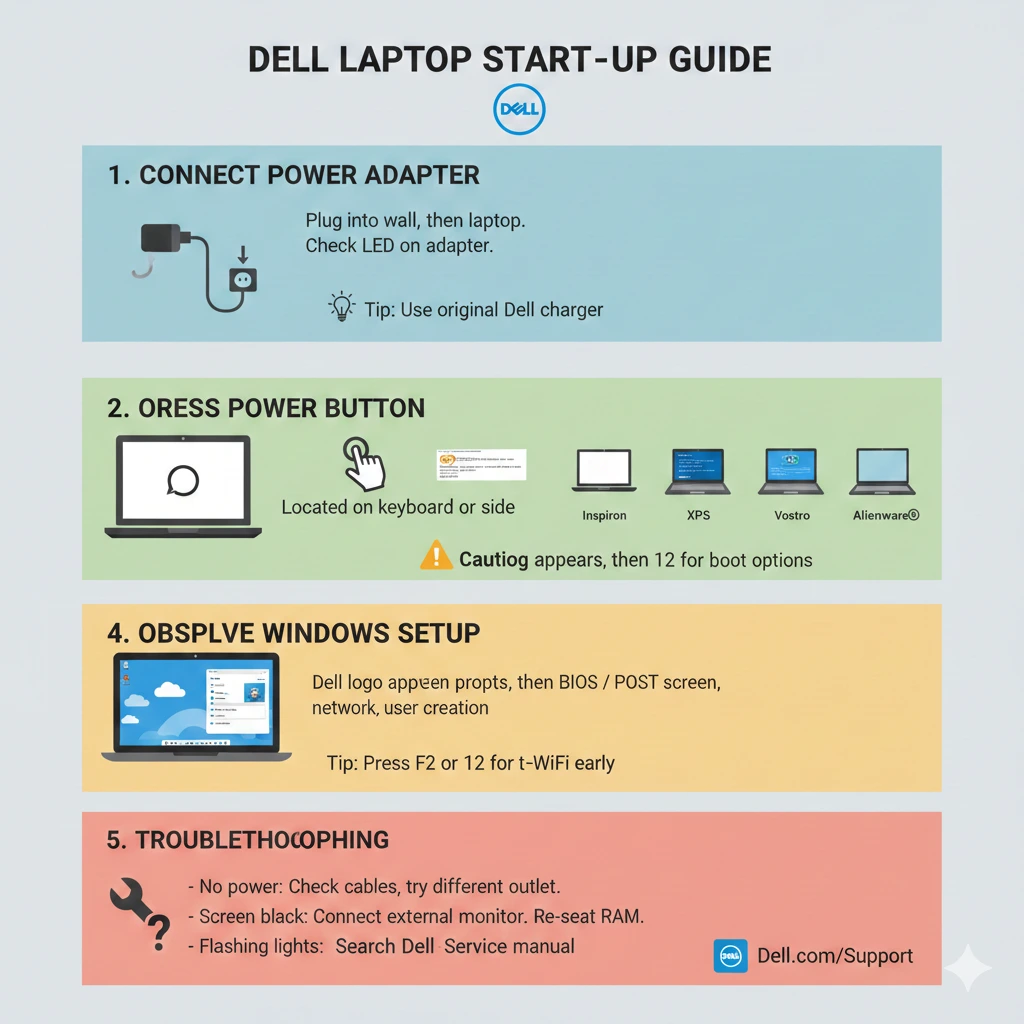
Connect the Power Adapter
- Use the official Dell adapter and plug it into a wall outlet.
- Connect the adapter to your laptop’s charging port.
- Observe the LED indicator:
- Solid light: Charging normally
- Blinking/off: Check power source or adapter
Tip: If the battery is entirely depleted, allow a few minutes for it to accumulate charge before starting the laptop.
Locate the Power Button
Different Dell series have slightly different power button positions:
| Dell Series | Power Button Location |
| Inspiron & Latitude | Top-right corner above the keyboard |
| XPS | Slightly above the top-right keyboard edge |
| Vostro | Slightly above top-right keyboard edge |
| Alienware | Illuminated button with Alienware logo |
Tip: Press and hold the power button for 1–3 seconds. Longer presses can trigger forced shutdown or system reset.
Observe Dell Logo & BIOS Screen
- The Dell logo appears immediately after pressing the power button.
- A POST (Power-On Self-Test) runs, checking CPU, RAM, storage, and input devices.
- If successful, your operating system (Windows or Linux) loads automatically.
Tip: If you see BIOS prompts or options like F12 Boot Menu, these are normal startup features. Don’t interrupt the process unless you need to troubleshoot or configure hardware settings.
Pro Tip: During setup, make sure the laptop stays powered by keeping it plugged in – this helps avoid shutdowns or losing data.
Right off, link your Microsoft account when setting up so that settings transfer smoothly. Sync happens automatically, pulling in your custom options without hassle. With it active, reach OneDrive and related tools straightforwardly. Updates roll out neatly afterward, adapting on their own
Dell Laptop Won’t Turn On name
- Starting up might seem simple, yet issues pop up for anyone, even long-time users. This walkthrough walks through fixing common problems when a Dell laptop won’t turn on. Each step helps move closer to getting it running again.
- Common Causes
- A flat battery – either dead or running low on power.
- A shaky charger or socket might be behind the issue. Sometimes it’s just a loose connection that trips things up.
- BIOS misconfiguration
- Corrupted or missing operating system files
- Residual electrical charge on the motherboard
Perform a Hard Reset
- Turn off the laptop completely.
- Unplug the power adapter and remove the battery (if removable).
- Press and hold the power button for 15–20 seconds to discharge residual power.
- Reconnect the power source and try turning on the laptop.
Check the Power Adapter
- Confirm LED indicator lights when plugged in.
- Test with a different power outlet or a compatible Dell adapter.
- Replace the adapter if necessary.
Run Dell Preboot Diagnostics
- Power on the laptop.
- Press F12 repeatedly when the Dell logo appears.
- Select Diagnostics from the boot menu.
- Follow on-screen instructions to check RAM, SSD/HDD, motherboard, and other components.
Pro Tip: Save the diagnostic results for Dell Support if professional assistance is required.
Reset BIOS Settings
- Press F2 during startup to enter BIOS.
- Select Load Defaults or Reset BIOS.
- Save changes and exit.
Use Windows Recovery Options
- Windows Recovery: Boot from a USB drive or recovery partition.
- Safe Mode: Press F8 or Shift + F8 to access Windows troubleshooting tools.
- Startup Repair: Automatically detects and fixes boot issues.
Special Startup Scenarios
Startup Loop or Freeze
- Windows Recovery: Boot from a USB drive or recovery partition.
- Safe Mode: F8 or Shift + F8 will bring you to the Windows built-in troubleshooting tools.
- Startup Repair: Automatically detects and fixes boot issues.
BIOS Update Issues
Symptoms: Dell logo repeats endlessly; Windows fails to load.
Boot in Safe Mode 2. Run Startup Repair 3. Disable unwanted startup programs 4. Update Windows and Drivers
Tips for Smooth and Fast Startup
Pro Tip: Clean Start-Up A clean start-up environment, combined with a minimum number of background applications and up to date driver,s will help to significantly improve the performance of your Dell laptop.
Pros & Cons of Dell Laptop Startup Experience name
| Pros | Cons |
| Simple, one-button startup for most models | Some laptops have hidden or integrated power buttons |
| BIOS and diagnostics are easily accessible | Older laptops may boot slowly |
| Smooth Windows installation for beginners | Startup loops may occur after updates |
| Preboot diagnostics identify hardware issues | Removable batteries are being phased out |
FAQs
A: Perform a hard reset, check the adapter, run preboot diagnostics, and reset the BIOS if needed.
A: Typically, the top-right corner above the keyboard or integrated with a fingerprint sensor.
A: Usually 1–3 seconds; longer presses can trigger forced shutdown.
A: Yes, if connected to a functioning power adapter.
A: Press F2 during the Dell logo screen to enter BIOS settings.
conclusion
Starting a Dell Laptop seems simple until you realize the proper method hides beneath surface tricks. Plug it in before turning it on – that move sets the tone. Press the power button exactly when timing asks without rushing or delaying too much. After power-up, resist opening Windows apps right away, even if fingers twitch toward screens they know. Let it sit briefly if the startup stutters once or twice because patience here reshapes future behavior. Each move matters more than rushing through them one after another.
Start by picking only genuine Dell adapters. Keep the BIOS and drivers current, too. Turn to internal check tools when problems pop up. Cut down on extra devices near boot time. Follow these steps, and your Dell system wakes up smoothly – for tasks, learning, or play.