Introduction
Turning on a Dell Laptop ought to go smoothly, though plenty happens when the machine does nothing at all. Dark screens, missing lights, and even flickering signals tend to puzzle people right away instead of revealing clear answers. Still knowing what moves to try – starting basic, moving deeper – brings clarity without extra hassle. This walkthrough takes each phase in order, so nothing gets skipped by accident or oversight.
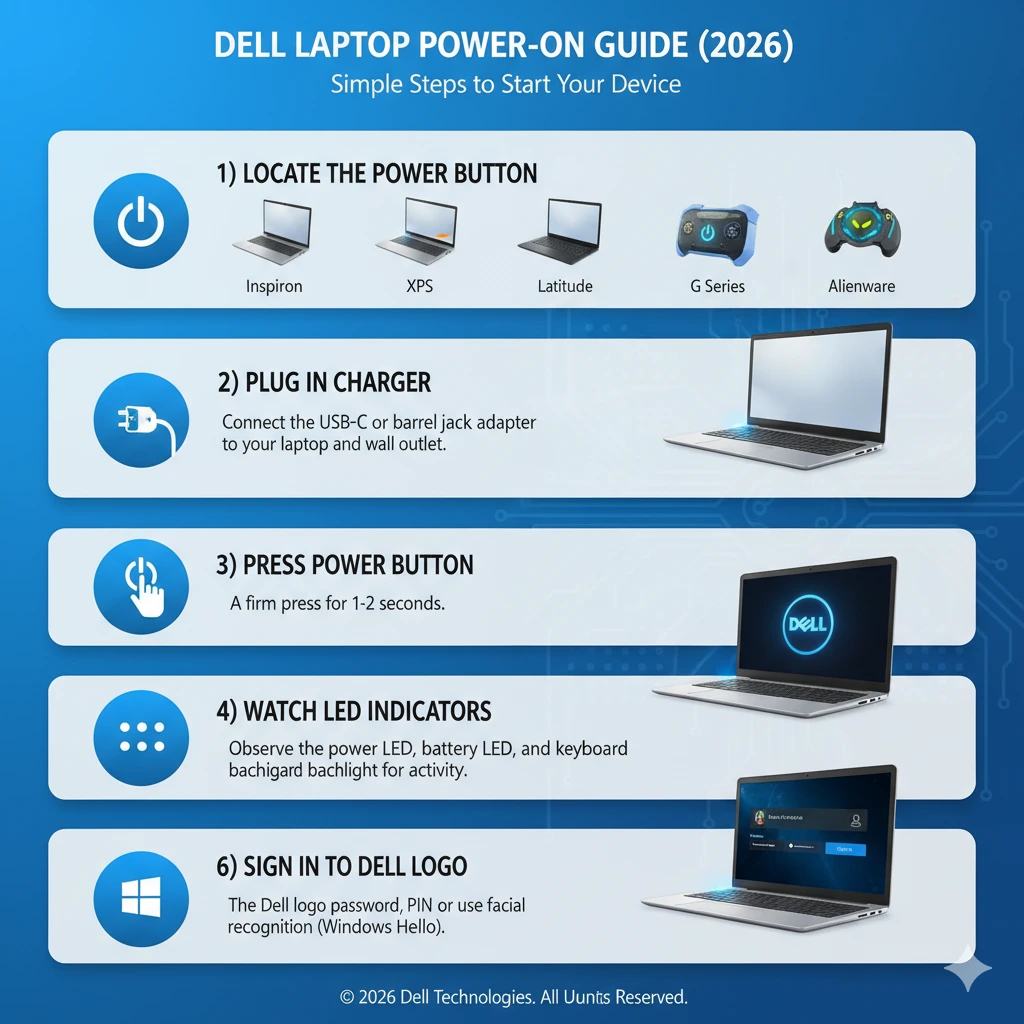
A fresh start on any model – Inspiron, XPS, maybe even an older Latitude – can go smoother when you know what steps actually help. When things stall at boot, instead of guessing, try working through each sign the machine gives. Even gaming rigs like Alienware respond well to clear checks before deeper fixes take shape.
What This Guide Covers
- How to accurately locate the power button on all Dell laptops
- Step-by-step instructions to power on your device
- Explanation of what occurs after pressing the power button
- Solutions for common issues preventing startups
- Advanced troubleshooting tips and hardware fixes
- Dell blink codes and their diagnostic significance
- FAQs
- Safety tips and best practices
Folks just starting might find their footing here, while those who love diving into details won’t get left behind – each part moves forward without skipping steps. Success isn’t assumed; it’s built in.
Where Is the Power Button on a Dell Laptop?
Before attempting to turn on your laptop, locating the power button is essential. Dell laptops vary in design, and the placement of buttons may differ depending on the model series.
| Model Series | Common Power Button Location | Notes |
| Inspiron | Top-right of the keyboard | Older Inspirons may have side buttons |
| XPS | Top-right or above the keyboard | Slim design, flat button |
| Latitude | Side or top of keyboard | Often recessed for security |
| G Series | Above the keyboard or near the hinge | Gaming-oriented layout |
| Alienware | Center above keyboard with light | RGB-backlit, prominent |
Tips to locate the power button:
- Look for the universal power icon: ⏻
- Some laptops integrate the button with a fingerprint reader
- Apply a gentle, firm press; excessive force isn’t necessary
Synonyms used for “press”: push, tap, activate, trigger, engage
How to Turn On a Dell Laptop
Follow these sequential steps to start your Dell laptop successfully:
Engage the Power Button
- Press the power button once firmly.
- Avoid holding it down unless performing a forced restart.
Synonyms for “press firmly”: Depress, push down, activate solidly, click, tap decisively
Observe LED Indicators
Most Dell laptops feature LED lights signaling power status.
- A steady light typically indicates adequate power.
- Blinking patterns may suggest specific issues.
Wait for the Dell Logo
After activating power, the Dell logo should appear on the display, confirming the POST (Power-On Self-Test) has commenced.
Step 5: Log In to Your Operating System
Once Windows (or your installed OS) has booted, input your credentials and begin using your laptop.
Pro Tip: If the laptop remains unresponsive, avoid panic. Most issues are rectifiable with minor troubleshooting.
Understanding What Happens After You Press Power
Understanding the startup sequence helps diagnose and correct issues when a laptop fails to boot.
POST (Power-On Self-Test)
The system checks hardware integrity, including memory modules, CPU, and basic motherboard functionality.
Signs your laptop is in POST:
- LED lights flash or flicker
- Fans spin briefly
- Hard drives or SSDs may initiate a short whirring sound
Synonyms for “check hardware integrity”: verify components, assess circuits, test electronics, inspect modules
BIOS/UEFI Load
After POST, the firmware interface initializes:
- The Dell logo appears
- System prepares boot configuration
- Peripheral devices (keyboard, mouse, storage) are detected
Synonyms for BIOS/UEFI load: firmware initiation, bootloader startup, system setup initialization
Operating System Boot
Finally, the OS takes over:
- The Windows loading animation appears
- The user login screen is displayed
- System becomes fully operational
Synonyms for “boot”: launch, start, initialize, power up, commence
Troubleshooting: My Dell Laptop Won’t Turn On
If your laptop refuses to power on, try these tiered troubleshooting methods.
No Lights or Response
Possible Causes: Power supply issue, dead battery, defective charger
Try the following:
- Verify the charger and outlet
- Use an alternate wall socket
- Test with a different Dell-compatible charger
- Disconnect all external USB devices
Synonyms for “verify”: check, confirm, inspect, ensure, test
Lights On But Black Screen
Possible Causes: Display problem, graphics failure, OS boot error
Solutions:
- Connect an external monitor
- Press F2 to access BIOS
- Press F12 for Dell Diagnostics
Synonyms for “connect an external monitor”: attach, link, interface, hook up, set up
Perform a Power Reset (Drain Residual Power)
Steps:
- Disconnect charger
- Remove the battery if detachable
- Press and hold the power button for 15–60 seconds
- Reconnect charger (and battery)
- Attempt to power on again
Why it works: Residual electricity in components can prevent startup; draining resets circuits.
Synonyms for “power reset”: hard reset, force reboot, electrical drain, system refresh
Advanced Troubleshooting and Fixes
If simple steps fail, more technical procedures can help.
Examine Laptop Hardware
- Charger: Ensure voltage matches Dell specifications
- Battery: Swollen or faulty batteries may block power
- RAM / Motherboard: Loose memory or motherboard faults can prevent booting
Steps:
- Reseat memory sticks
- Test startup with a single RAM module
- Inspect for visible motherboard damage
Synonyms for “reseat”: reinstall, reposition, reinsert, adjust, reconnect
Dell Blink Codes & Beep Codes
Dell laptops communicate hardware errors using LED blink codes and beep sequences.
| Blink Pattern | Likely Meaning |
| 2 amber + 3 white | Memory module failure |
| 1 amber + 2 white | Motherboard fault |
| 3 amber + 1 white | Display malfunction |
Important: Blink codes may vary by model — always refer to Dell’s official support page.
Synonyms for “communicate hardware errors”: indicate, signal, notify, display diagnostics, report
FAQs
A: Blinking battery lights typically indicate charging or battery issues. Perform a power reset and test with a known functioning charger.
A: Yes, if it’s connected to a reliable power source. A dead battery alone doesn’t prevent operation.
A: For a normal start — a single firm press. For resets — hold for 10–15 seconds.
A: No, modern laptops often feature sealed batteries that require tools to remove.
A: Yes, BIOS diagnostics provide early detection of hardware issues before Windows loads.
Conclusion
Most Dell Laptops turn on without trouble once you know where things are. Power buttons sit up top near the screen or along the side edge – spotting them helps. The machine shows signs it’s waking: lights blink, fans spin briefly. When nothing happens, try plugging in the charger first. A full reset might work if the screen stays dark. Holding down the power piece for twenty seconds can clear odd glitches. Users who take their time often see what went wrong before panicking. Confidence grows when small steps lead somewhere.
Recap:
- Identify the power button
- Use a verified power source
- Push down hard enough to begin
- Look for lights and brand marks
If needed, try a power restart along with diagnostic tools. Sometimes, turning it off and then on works better than expected.
When simpler fixes do not work, try deeper solutions. Start there if quick attempts fall short. Go further once straightforward steps show no result. Only move ahead this way after exhausting easier options.ns
A clear path unfolds here for 2026, built so anyone owning a Dell laptop finds confidence at startup – no matter if they’re just starting out or already dive deep into settings. Because knowing matters more when the screen lights up.