Introduction
These days, snapping a shot of what’s on your screen comes up often – no matter if you’re studying or working. When something goes wrong online, keeping a copy helps. Sharing part of a webpage? That Happens too. How to take a screenshot on a Lenovo laptop. Messages in chats sometimes need preserving. Even building a how-to guide leans on this trick. It just fits right into how people handle things digitally now.
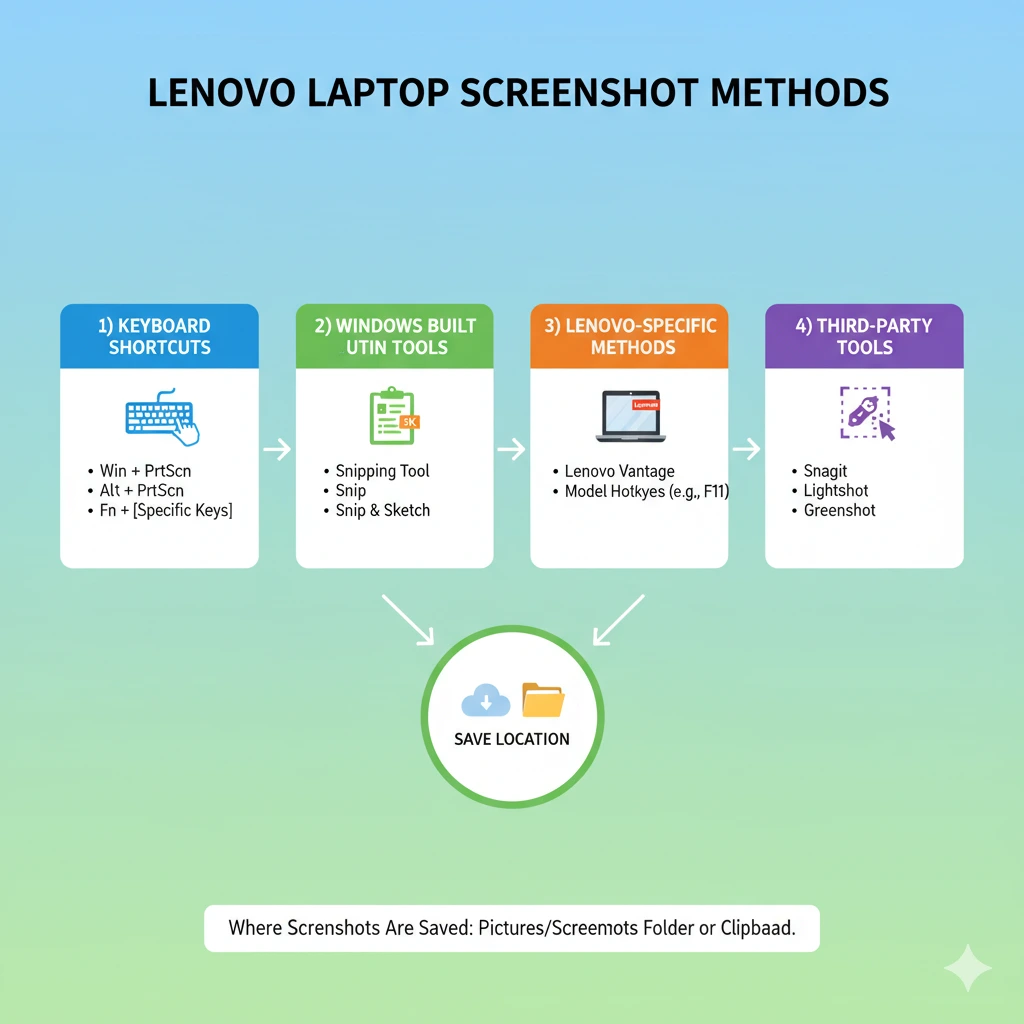
Snap a screen image easily if you own a Lenovo laptop running Windows. Press certain keys together instead of hunting through menus. Built-in tools already inside Windows handle captures without extra downloads. Some Lenovo laptops include unique functions that trigger snapshots differently. Outside apps also work, fitting how you prefer to save what’s onscreen.
Explanation
This big handbook shows all possible ways to grab screen images on Lenovo laptops in 2026. With clear steps, you see how each trick runs, where files go best, fixes when things fail, and real cases that help whether you know a lot or are just starting.
When this piece wraps up, deep know-how about taking screenshots on any Lenovo machine with Windows sits right in your hands. Efficiency finds its way into every method shown here, no matter the model or system flavor running under the hood.
Understanding Screenshots on Lenovo Laptops
Picture this – knowing the basics changes everything. What a screenshot really is, along with its practical worth, shapes how well you work with one. Grasping that piece first makes the rest fall into place.
What Is a Screenshot?
A snapshot of your monitor, captured instantly – this image locks whatever appears on screen right then. One moment becomes a file, ready to store or send later. Picture pointing a lens at your desktop, only there is no lens involved. The scene lives on as a digital still life, movable between devices.
Why Screenshots Are Essential
Pictures snapped from your screen come in handy for different reasons
- Grab key details fast when something goes wrong. Jot down errors before they vanish. Save time by noting exactly what shows up on screen. Spot patterns later with clear notes. Keep things simple – write it as you see it.
- Share instructions: Communicate complex steps with colleagues or friends.
- Saving proof means holding on to texts, purchase logs, or chat histories. Messages stick around when you store them instead of deleting them. Online receipts? They count too – save those. Talking with customer help? Screenshots work just fine. Proof builds up slowly through small saved pieces. Each note or log adds weight later on.
- Pictures show the steps clearly when teaching something new. Because they do, tutorials often include them. Guides work better with images that explain each part. Visuals help people understand what words alone cannot. Presentations gain clarity through well-placed shots of screens.
Most ways to take screenshots on Lenovo machines rely on standard Windows tools, yet some features made just for Lenovo models make it even easier. Though built-in options work fine, unique software found only on these devices speeds things up a bit.
Types of Screenshots
Pictures taken on screen change based on what you’re doing. Knowing each type means getting exactly the image you want.
| Screenshot Type | Description |
| Full Screen | Captures everything visible on the screen. |
| Active Window | Captures only the currently active application window. |
| Selected Area | Captures a specific portion you define. |
| Scrolling Screenshot | Captures long webpages or documents using specialized software. |
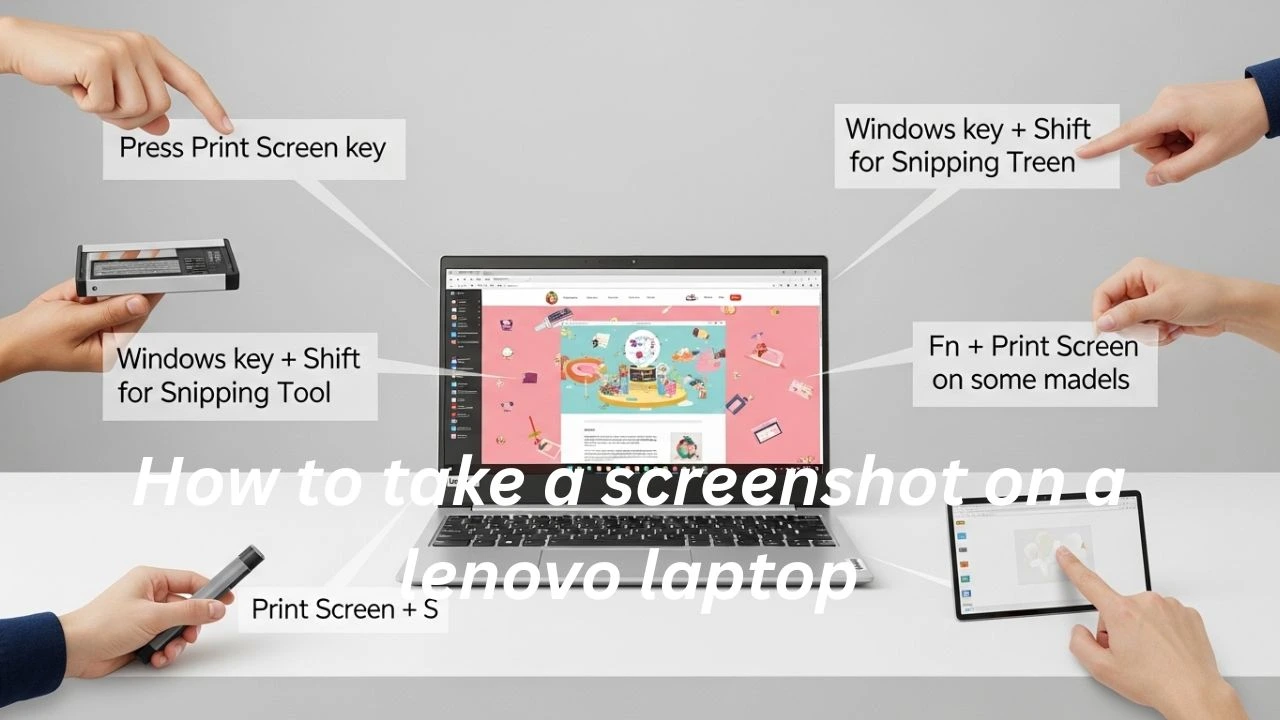
Capturing Screenshots Using Keyboard Shortcuts
Pictures of your screen usually happen quickest when you use key combos. These tricks skip extra apps, getting things done in a flash. Most times, they just work without asking questions.
Full-Screen Capture
Snapshot lands straight into your Pictures > Screenshots spot without delay. A full-screen capture appears there right away. Right after triggering it, the picture settles in that location quietly. The moment you act, a copy stores itself behind the scenes. Everything on display gets saved exactly then. Your system tucks the visual record safely inside that folder. Capture happens fast – no extra steps follow.
A full screen grab happens smoothly, no extra actions required. By using this approach, everything shows up just once, and nothing is missed.
Copy Screen to Clipboard
Captured image now sits ready in your storage space. From there, slip it into tools such as Paint, Word, or any chat platform. It waits only for your next move.
Active Window Screenshot
Now the tool takes a snapshot of whatever window is on top, sending that image straight into memory for pasting later.
Optional Lenovo-Specific Combos
Some Lenovo models need the Fn button when function keys are disabled. Examples of key pairings might be:
- Fn + PrtScn
- Press Fn together with the Windows key, then hit PrtScn at the same time
Finding the lock setting for your Fn key? Check inside the BIOS menu on most Lenovo models. Another path leads through Lenovo Vantage instead. Each tool offers control without extra steps. Access one based on what feels easier. Settings shift quietly once applied.
Using Windows Built-In Screenshot Tools
Picture-taking on Windows isn’t just about hitting keys. Built-in options give finer handling, going beyond basic snaps. Some tools shape how you capture moments from your screen. Each one steps up when quick grabs aren’t enough.
Snip & Sketch / Snipping Tool
Down at the bottom of things, pressing Windows plus Shift then S brings up a small toolbar. This happens on both Windows 10 and Windows 11. From there, you can pick what part of the screen to grab
- Rectangular snip
- Free-form snip
- Window snip
- Full-screen snip
After taking the screenshot:
- It is copied to your clipboard automatically.
- A notification appears allowing you to edit or save the image.
Open Snipping Tool
Steps:
- Open Start Menu
- Search for Snipping Tool
- Click New
- Select the area you want to capture
First things first, tweak the image how you want it. Hold on a second, then tap the save option right after
Advantages of Built-In Tools:
- Greater control than using Print Screen
- Annotation options like a pen or a highlighter
- Delayed screenshot options for menus
- Custom area selection
Lenovo-Specific Screenshot Methods
On plenty of Lenovo devices – like ThinkPads, Yogas, and Legions – you’ll find Vantage already sitting there. This tool gives you access to settings that tweak performance alongside support features
Lenovo Vantage App
Lenovo Vantage is pre-installed on many models, including ThinkPad, Yoga, and Legion. It allows:
- Customization of screenshot hotkeys
- Creating screenshots without Windows shortcuts
- Adjusting capture settings
How to Use Lenovo Vantage for Screenshots:
- Open Lenovo Vantage
- Navigate to Input / Keyboard Settings
- Locate Screenshot Options
- Assign your preferred hotkey
This method is especially useful when standard keyboard shortcuts fail.
Model-Specific Function Key Shortcuts
Some Lenovo devices, such as IdeaPad, Yoga, and Flex series, might use:
- Fn + Spacebar
- Fn + Windows + PrtScn
Start by checking the guide that came with your Lenovo device. Or head straight to their help website for exact steps. What matters is using trusted sources when you need answers. Each step should come from somewhere reliable. Never guess what to do next.
Managing Screenshot Save Locations
Knowing where screenshots are stored is critical, particularly for frequent users.
| Method | Save Location |
| Win + PrtScn | Pictures > Screenshots |
| PrtScn / Alt + PrtScn | Clipboard (paste manually) |
| Snipping Tool / Snip & Sketch | Save manually anywhere |
| Lenovo Vantage | Configurable |
Tip: If screenshots aren’t auto-saving, check if Windows is using the default Pictures folder. You can adjust this in the folder properties.
Taking Screenshots Without a Print Screen Key
Many modern Lenovo laptops, including ultra-thin and Yoga models, lack a dedicated PrtScn key. Here’s how to capture screenshots without it:
Best Alternatives
- Windows + Shift + S — Ideal for selecting a custom area.
- Lenovo Vantage shortcuts — If your model supports them.
- Third-party applications — When built-in tools aren’t enough.
These methods work seamlessly even on devices without a dedicated Print Screen key.
Advanced Screenshot Options with Third-Party Tools
Sometimes built-in tools fall short, particularly for advanced features like scrolling capture or instant sharing. Here’s a breakdown of popular third-party tools:
| Tool | Features | Pros | Cons |
| Snagit | Scrolling capture, annotations, video clips | Powerful, professional | Paid |
| Lightshot | Quick area capture, online sharing | Free, simple | Limited advanced tools |
| Greenshot | Fast region capture, export options | Lightweight, fast | Basic editing |
Short Reviews:
- Snagit: Excellent for tutorials and long webpages, includes a professional editor, ideal for power users. Paid.
- Lightshot: Free, allows quick annotation and sharing, best for casual users.
- Greenshot: Open-source, lightweight, suitable for older systems, covers essential capture needs.
Troubleshooting Screenshot Issues
Occasionally, screenshots don’t work as expected. Here’s how to resolve common problems:
Problem: PrtScn opens Snipping Tool instead of capturing
Fix: Settings → Ease of Access → Keyboard → Turn off Print Screen shortcut
Problem: Screenshots not auto-saving
Fix:
- Use Win + PrtScn
- Confirm the Pictures > Screenshots folder exists
- Check the Snipping Tool save path
The Fn key is not functioning
Fix:
- Toggle Fn lock in BIOS
- Use Lenovo Vantage to configure keys
Problem: Clipboard not capturing
Fix:
- Restart Windows Explorer
- Retry the screenshot
- Check app permissions
Quick Reference Cheat Sheet
| Screenshot Method | Shortcut | Save Location |
| Full Screen | Win + PrtScn | Auto-save |
| Clipboard Capture | PrtScn | Clipboard |
| Active Window | Alt + PrtScn | Clipboard |
| Custom Area | Win + Shift + S | Clipboard → Save |
| Snipping Tool | Open App | Save manually |
| Lenovo Hotkey | Configurable | Configurable |
FAQs
A: Only Win + PrtScn auto-saves. Other methods copy to the clipboard only.
A: Use Win + Shift + S, Lenovo Vantage hotkeys, or third-party tools like Lightshot.
A: Press Win + Shift + S to open Snip & Sketch and select the area.
A: Yes. Go to Pictures → Screenshots → Right-click → Properties → Location → Move.
A: Yes, reputable apps like Snagit, Lightshot, and Greenshot are widely used and secure by most users.
Conclusion
Pressing keys at once grabs an image of your screen fast. If you want only part of it, drag a box around what Matters instead. Another way opens a tool that waits for your move. Some folks like using software they install themselves. Each method works fine, depending on how you like to work
- Quick keyboard shortcuts
- Built-in tools with editing features
- Lenovo-specific shortcuts
- Advanced third-party software
This one covers all bases. What’s inside matches what you’re after.
Pictures of your screen make it easy to grab, mark up, or send details fast. Keep this page handy, and you will never forget the steps to snap them right – whether you own an older Lenovo or run the newest Windows build. A fresh approach to these steps brings smoother workdays along with sharper, cleaner digital messages that show exactly what matters.