Introduction
Capturing screenshots in today’s working life has become a fundamental part of the way we work. On an HP EliteBook running Windows 10, you have numerous ways to capture almost any part of your screen. You may be saving crucial information that’s difficult to type out, showing an error message to IT, creating steps for something new you have learned, or simply to make an explanation of something far clearer. How to Screenshot on HP Elite Book Laptop Windows 10. Knowing an easy way to capture and share important information can also greatly improve your productivity.
Whether you’re looking to take a screenshot using keyboard shortcuts, the built-in tool on HP EliteBooks, or third-party applications, this is the guide for you. We cover every scenario for taking a screenshot on an HP EliteBook, as well as covering where the screenshot is saved to, and some handy troubleshooting tips and hints for increasing productivity. Our guides are written in easy-to-understand plain English, with an explanatory style and examples that are relevant for both beginners and experts.
Why Screenshots Matter on Your HP EliteBook
A screenshot is a picture of your laptop screen taken at a specific moment. They are incredibly useful for many things.
One of the many great things about Windows 10 is that it comes with a number of built-in screen capture shortcuts. Capturing the screen and creating an image file can be very useful for a variety of reasons. The most common is to take a picture of something on screen and share it with someone. However, there are many other times when you may need to grab the screen for use in a presentation or document.
There are also plenty of occasions when you might take dozens of screens at a time, as you find things that are worth capturing as you surf the web. Take a look at these popular How-To articles and learn more about Windows.
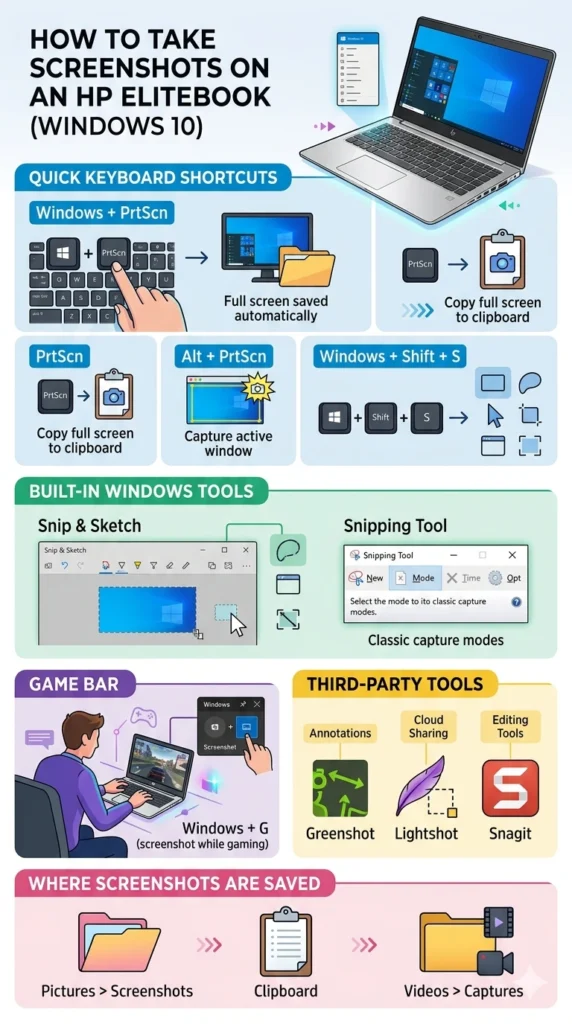
Quick Keyboard Shortcuts You Must Know
Windows 10 Tips on HP EliteBook: Capture Your Screen. There are several ways that you can take a screenshot of your screen,n depending on what you want to achieve. I show 3 ways to take a screenshot on an HP EliteBook running Windows 10, using the built-in Windows key commands as well as using a third-party screen capture application, which includes annotation and editing tools.
Screenshot Shortcut Table
| Shortcut | Function |
| Enable PrtScn if the secondary function key | Capture full screen and save automatically |
| PrtScn | Copy the active window to the clipboard |
| Alt + PrtScn | Enable PrtScn if the secondary function key |
| Fn + PrtScn | Enable PrtScn if secondary function key |
| Windows + Shift + S | Open Snip & Sketch capture tool |
Capture Full Screen — Save Automatically
Shortcut:
Windows key + PrtScn
What happens:
- Captures the entire screen instantly
- Automatically saves the screenshot as a PNG file
Where it saves:
Pictures > Screenshots folder
Why use it:
- Ideal for capturing your entire display quickly without manually saving
- Useful for full-page reports, desktop setups, or multi-window captures
Tip: Combine with OneDrive sync to back up screenshots automatically.
Copy Full Screen to Clipboard
Shortcut:
PrtScn
Alternative:
Fn + PrtScn (on models where PrtScn is a secondary key)
What happens:
- Copies the full screen to the clipboard
- Does not automatically save
How to save manually:
- Open Paint, Word, or OneNote
- Press Ctrl + V to paste the screenshot
- Save the file in your preferred location
Best use case:
- When integrating screenshots directly into documents, presentations, or emails, without creating extra files.
Capture Only the Active Window
Shortcut:
Alt + PrtScn
Alternative:
Fn + Alt + PrtScn (if PrtScn is secondary)
What happens:
- Captures only the active window (program in focus)
- Copied to clipboard, requires manual saving
Example:
- If your browser is active, only the browser window is captured, excluding the taskbar and desktop icons.
Best use case:
- When you want focused captures of one application rather than the whole screen.
HP EliteBook Keyboard Tip
On some EliteBook models, the PrtScn key functions as a secondary key. If shortcuts don’t work:
- Try Fn + PrtScn
- Or Fn + Windows + PrtScn
- Ensure keyboard drivers are updated for proper functionality
Windows Built‑In Screenshot Tools
While keyboard shortcuts are fast, Windows 10 also provides built-in tools for more control, annotation, and selective capturing.
Flexible All‑Purpose Screenshot Tool
Shortcut:
Windows + Shift + S
Modes Available:
| Mode | Function |
| Draw a rectangle around the target area | Draw a rectangle around target area |
| Free‑form Snip | Draw custom shapes |
| Window Snip | Select a specific application window |
| Full-screen Snip | Capture the entire display |
After snipping:
- Screenshot is copied to the clipboard
- Notification pops up — click to edit, annotate, or save
Best use case:
- Flexible, fast captures for emails, guides, or visual explanations
- Supports cropping, highlighting, or adding quick notes
The Classic Utility
Though Microsoft is phasing out Snipping Tool in favor of Snip & Sketch, it remains functional in Windows 10.
How to open:
- Press Windows + S
- Type Snipping Tool and open it
- Click New to start a capture
Modes Available:
- Free-form
- Rectangular
- Window
- Full-screen
Saving:
- Manually select a save location
- Can be annotated with a pen or highlighter
Best use case:
- Basic captures without extra software
- Light annotation for simple instructions or documentation
Take Screenshots with Windows Game Bar
The Windows Game Bar is primarily for gamers, but it works for general screenshot capture.
Shortcut:
Windows + G
Steps:
- Click the camera icon or press Windows + Alt + PrtScn
- Screenshots are saved to:
Videos > Captures
Best use case:
- While playing games or recording video sessions
- Capturing Dynamic content or live apps
Third‑Party Screenshot Software
For advanced needs like scrolling captures, cloud sharing, or professional annotation, third-party tools are recommended.
| Tool | Features | Ideal Use Case |
| Greenshot | Free, lightweight, annotations | Quick captures & notes |
| Lightshot | Fast capture, instant sharing | Social media or team sharing |
| Snagit | Advanced editor, workflows | Professional tutorials & guides |
When to consider third-party tools:
- Capturing long web pages
- Need advanced editing or cloud workflows
- Sharing quickly with team members or online platforms
Where Your Screenshots Are Saved
Screenshots can be saved in various locations depending on the method:
| Method | Save Location |
| Windows + PrtScn | Pictures > Screenshots |
| PrtScn | Clipboard only (paste to save) |
| Alt + PrtScn | Clipboard only (paste to save) |
| Snip & Sketch | Clipboard → edit & save |
| Snipping Tool | Manual save location |
| Game Bar | Videos > Captures |
Pro tip: Lost a screenshot? Often it’s still in the clipboard — try pasting in Paint, Word, or another app.
Troubleshooting Screenshot Problems
Even with these tools, issues may arise. Here’s how to resolve common problems:
Problem 1: PrtScn key not responding
- Possible reasons: Fn key needed, driver issue, disabled key
- Fixes:
- Try Fn + PrtScn or Fn + Windows + PrtScn
- Update keyboard drivers
- Check keyboard settings
Screenshot appears black or blank
- Causes: Secure apps block capture, graphics driver issues
- Fixes:
- Use Snip & Sketch or third-party tools
- Update graphics drivers
Screenshots not saving
- Causes: Using clipboard-only mode, folder missing, storage full
- Fixes:
- Paste and save manually
- Ensure the Screenshots folder exists
- Free up storage
Productivity Tips for Faster Screenshots
Expert strategies to enhance screenshot workflow:
- Use Windows + Shift + S for selective captures
- Organize screenshots in custom folders
- Memorize EliteBook-specific shortcuts
- Annotate important areas quickly with built-in tools
- Sync with OneDrive or Google Drive for instant backup
- Use professional tools like Snagit for frequent image work
Pros & Cons of Every Screenshot Method
| Method | Pros | Cons |
| Keyboard shortcuts | Extremely fast, no software | No editing capabilities |
| Snip & Sketch | Flexible, editing, annotation | Clipboard-based until saved |
| Game Bar | Great for gaming & video | Limited editing for non-gaming |
| Third-party tools | Feature-rich, cloud integration | Requires installation, sometimes paid |
FAQs
A: Yes. Press Windows + Shift + S, select the area, then click the notification to edit & save.
A: Clipboard-only methods (PrtScn alone) require manual pasting. Ensure you save or use Windows + PrtScn.
A: Windows 10 does not have built-in scrolling capture. Use Snagit or browser extensions for this.
Conclusion
Well, I think we’ve finally got all the controls we need for taking screenshots on an HP EliteBook running Windows 10. PrtScn by itself gives us a copy of the entire screen. Holding down Fn in addition to PrtScn gives us a copy of the screen with the EliteBook’s captured image buttons included. Ctrl + PrtScn opens Snip & Sketch for further editing. And finally, the Game Bar can be used to take screenshots of our gaming action. In addition to all of these, there are third-party apps that can be used to take screenshots and possibly enhance workflow.
Screen capture is used for so many things – from making how-to videos, to documenting a bug, to communicating with remote colleagues, and so much more. To keep up with all of the different Responsibilities that we have in our roles as online support professionals, we have to be able to not only record, edit, and share our screens efficiently, but we also have to be able to do it all with the least amount of hassle possible. Here are a few shortcuts and tips to help you to do just that. Try them out,t and you’ll be an expert screen capture, edit, and share pro in no time.