Introduction
Many users install Ventoy perfectly, copy their ISO files, insert the USB into a Dell Laptop, and install Ventoy, copy their ISO files, plug the USB into your Dell laptop… and nothing happens.
No boot menu entry. No USB detection. Sometimes it even jumps straight into SupportAssist Diagnostics as if your USB doesn’t exist.
If this sounds familiar, you’re not alone.
In 2026, Dell laptops will use stricter UEFI firmware rules, aggressive Secure Boot enforcement, and optimized fast-boot pipelines that often block external boot tools like Ventoy silently. The frustrating part? Everything may look correctly set up—but a single hidden BIOS setting can break the entire process.
Common Dell–Ventoy failure symptoms include:
- Ventoy USB not appearing in the boot menu
- Secure Boot silently blocks USB boot
- Dell is loading SupportAssist instead of Ventoy
- Ventoy menu loads, but ISOs refuse to boot
Here’s the truth: Ventoy is not the problem. Dell firmware behavior is. Unlike generic guides, this tutorial focuses specifically on Dell systems—covering correct BIOS sequence, Secure Boot handling, and real-world fixes that actually work in 2026.
Best ISO Types for Dell + Ventoy
Not all ISOs behave equally on Dell systems.
Most reliable ISO types:
- Windows 10/11 official ISOs
- Ubuntu, Fedora, Linux Mint
- WinPE-based recovery tools
Problematic ISOs:
- Old Linux distributions
- Modified/custom ISOs
- DOS-based tools
If an ISO fails, always test with a fresh official version first.
What Is Ventoy? (Quick but Complete Overview)
Ventoy is an open-source multiboot USB framework that allows you to boot multiple ISO files from a single USB drive—without repeatedly formatting the drive.
Instead of recreating bootable media every time, Ventoy lets you copy and paste ISO files directly.
Key Advantages of Ventoy
- No reformatting required after installation
- Supports Windows, Linux, WinPE, and recovery tools
- Compatible with both UEFI and Legacy BIOS
- Optional Secure Boot support
- Extremely lightweight and fast
- Ideal for technicians, students, and IT professionals
On Dell laptops, Ventoy is incredibly powerful—but only when the BIOS is configured correctly.
Understanding Dell BIOS, UEFI & Boot Behavior
Before configuring Ventoy, you must understand how Dell firmware actually works.
Dell Boot Environment Explained
Most Dell laptops ship with these default settings:
| Feature | Default Behavior |
| Boot Mode | UEFI |
| Secure Boot | Enabled |
| USB Boot | Allowed but restricted |
| Boot Menu Key | F12 |
| BIOS Setup Key | F2 |
Dell’s UEFI firmware is far stricter than HP, Lenovo, or ASUS—making improper Ventoy boot setups fail silently.
UEFI vs Legacy Boot on Dell (Critical Difference)
- Faster startup
- Required for Windows 11
- Compatible with modern ISOs
- Default on all modern Dell laptops
Legacy Boot (Compatibility Mode)
- Old BIOS-style booting
- Useful for very old Linux or DOS ISOs
- Disabled by default on new Dell models
- Hidden until Secure Boot is disabled
Install Ventoy on USB (Correct Method)
Download Ventoy
- Visit the official Ventoy website
- Download the Windows or Linux package
- Extract all files completely
Install Ventoy on USB
- Insert an 8GB or larger USB drive
- Launch Ventoy2Disk
- Select the correct USB device
- Click Install
- (Optional) Enable Secure Boot support
This process erases the USB drive.
Copy ISO Files
- Open the Ventoy USB partition
- Copy ISO files directly
- No formatting required again
You can add, remove, or replace ISOs anytime.
How to Enter Dell BIOS & Boot Menu (Beginner-Friendly)
Open Dell Boot Menu
- Power ON the laptop
- Repeatedly press F12
- Select USB Storage Device
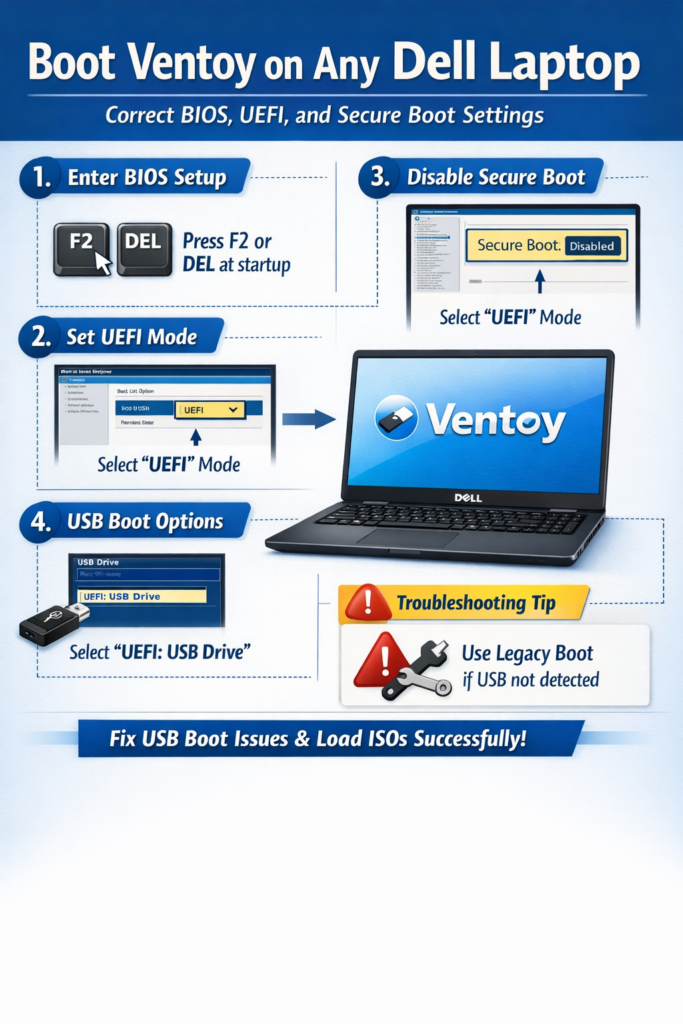
Configure Dell BIOS for Ventoy Boot (Essential Steps)
Enable USB Boot
BIOS → Boot Configuration
Enable USB Boot Support
Adjust Boot Sequence
BIOS → Boot Sequence
Ensure the USB Storage Device is enabled
Disable Fast Boot (Highly Recommended)
Fast Boot skips USB detection.
BIOS → POST Behavior → Disable Fastboot
Secure Boot & Ventoy on Dell Laptops
How Secure Boot Affects Ventoy
Secure Boot allows only signed bootloaders.
Ventoy does support Secure Boot, but Dell firmware often blocks key enrollment.
Ventoy Secure Boot Reality on Dell
| Scenario | Result |
| Secure Boot ON | Often blocked |
| Secure Boot OFF | Almost always works |
| Manual key enrollment | Inconsistent |
Recommended Secure Boot Strategy (Proven)
Temporary Secure Boot Disable (Best)
- Enter BIOS (F2)
- Secure Boot → Disable
- Save & Exit
- Boot Ventoy
You can re-enable Secure Boot later.
Secure Boot with Ventoy Key (Advanced)
- Enable Secure Boot support during Ventoy install
- Boot Ventoy
- Enroll the key when prompted
Troubleshooting: Ventoy Not Booting on Dell Laptop
Ventoy USB Not Detected
Causes
- Fast Boot enabled
- USB port incompatibility
- Corrupt Ventoy install
Fixes
- Disable Fast Boot
- Use the USB 2.0 port
- Reinstall Ventoy
Dell Boots to Diagnostics
Cause: Secure Boot is blocking USB
Fix: Disable Secure Boot
ISO Won’t Boot
Fixes
- Try a newer ISO
- Switch UEFI ↔ Legacy
- Re-copy the ISO file
Pros & Cons: Using Ventoy on Dell Laptops
Pros
- One USB for many OS installers
- No repeated formatting
- Works on most Dell models
- Ideal for IT professionals
Cons
- Secure Boot complications
- BIOS configuration required
- Some ISOs need tweaks
Best Practices for Reliable Ventoy Boot on Dell
- Keep Dell BIOS updated
- Disable Secure Boot during setup
- Use the latest Ventoy version
- Avoid low-quality USB drives
- Test ISOs individually
Dell BIOS Updates & Ventoy Compatibility
Recent Dell firmware updates (2024–2026 models like XPS, Latitude, Inspiron) have introduced:
- Stricter Secure Boot key validation
- Faster POST sequences (reducing USB detection window)
- Auto-prioritization of internal drives
Practical insight:
Even if your settings are correct, newer Dell BIOS versions may still skip USB boot unless:
- You press F12 early and repeatedly
- Fast Boot is disabled
- USB is inserted before powering ON
Many technicians now recommend using USB 2.0 ports for better detection stability, especially on newer ultrabooks.
FAQs
A: Secure Boot and Fast Boot usually block USB boot.
A: No. UEFI works best when using very old ISOs.
A: Yes. Ventoy never modifies internal storage.
A: Yes—Ventoy fully supports Linux distributions.
Conclusion
Ventoy is one of the most powerful USB boot tools available—but Dell laptops require precision.
The key takeaway is simple:
- Disable Secure Boot (at least temporarily)
- Turn off Fast Boot
- Use the correct BIOS sequence and USB ports
Once these are configured, Ventoy becomes extremely reliable—even across multiple Dell models. If you follow this guide step-by-step, you’ll eliminate boot failures and create a stable, reusable multiboot system for years to come.