Introduction
When darkness holds steady, yet the charge light shines with zero response, sometimes halting at the Lenovo emblem, my Lenovo laptop won’t turn on. Hope might seem lost. Truth is, nearly every time, you can fix it yourself – no expensive service needed.
Start here if your Lenovo laptop refuses to start. This handbook walks through each possible power issue, using clear steps that go from basic fixes to deeper repairs involving internal parts or system software. Work through these methods one at a time – some need only a cable swap, others call for careful handling of circuits or updates behind the scenes. You’ll learn exactly what blocks the startup and how to bring the machine back without risk. Length stays close to the original, just clearer.
We will cover:
- Common signs and symptoms
- Detailed DIY fixes
- Advanced troubleshooting (BIOS, RAM, CMOS battery)
- When to involve a professional technician
- Got a few more pointers that might help when figuring things out. Some handy gadgets make spotting issues easier, too
Understanding Common Symptoms of a Lenovo Laptop That Won’t Turn On
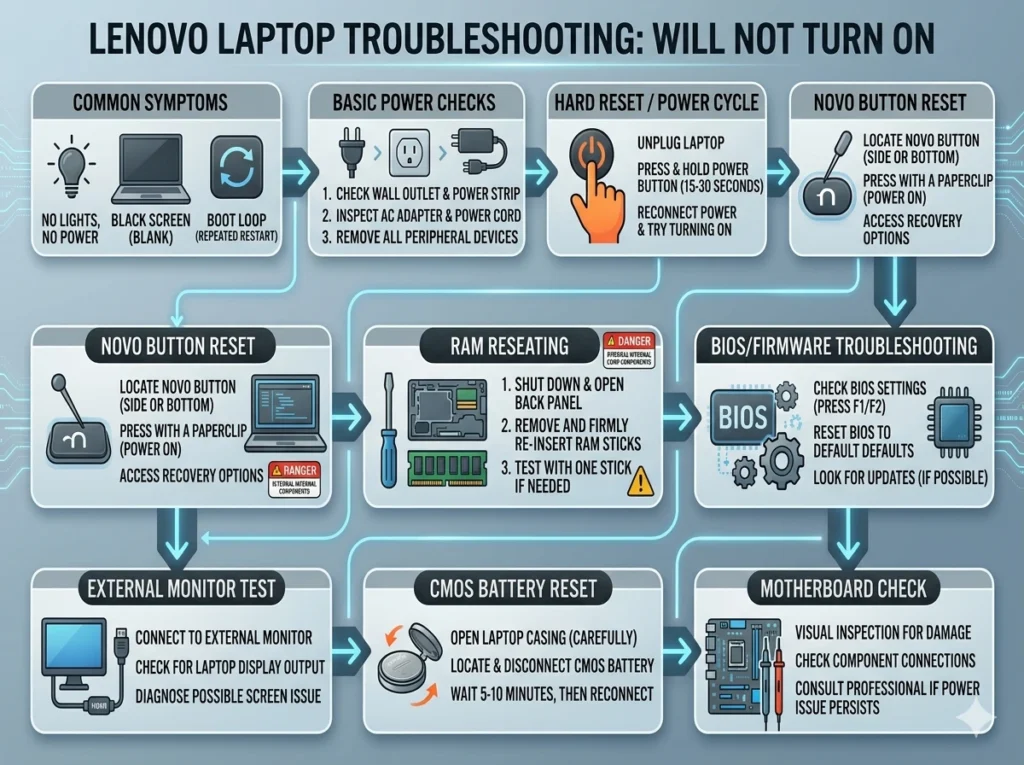
Figuring out which sign stands out helps match the fix. Here’s a snapshot of common start-up troubles, spelled out simply
| Symptom | Probable Cause | Notes |
| No lights, no sound | Faulty power adapter, dead battery, and motherboard failure | Usually related to the power supply, start by testing the adapter and outlet |
| Charging LED on, no boot | Power logic error, firmware glitch | Fans may spin, but the screen remains black; it could be BIOS-related |
| The Lenovo logo appears, then the laptop restarts | Boot loop, RAM instability, firmware corruption | Intermittent startup issues; often resolved by BIOS reset or RAM reseat |
| Blank screen with fans running | GPU, RAM, or display malfunction | An external monitor test can help pinpoint internal vs display failure |
A laptop showing no signs of life might still have a working heart. Usually, it is not the main board gone bad but something smaller causing trouble. Power supply issues pop up more than you would think. Sometimes the machine just needs a reset deep inside its code. Other times, the plug or cell pack refuses to deliver energy.
Initial Power & Connectivity Verification
Start by checking every power cable and outside device before diving into fixes inside the machine. Skipping this step might lead to hours lost or extra frustration down the line.
Examine the Power Source and Charger
- Try another wall plug if the first one seems off. Maybe the spot where you’re charging just won’t work. Switching sides could make it start up fine. A new socket might be what it needs. Sometimes the hole in the wall is the real problem.
- A closer look at the charger cable might reveal frayed spots or worn insulation. Bent pins on the adapter can pop up after drops or rough handling. Exposed wires show when outer coverings split open over time. Heat discoloration near connections often hints at deeper issues lurking beneath.
- A different charger might help – try one that’s certified by Lenovo and already works.
Most new businesses that fail do so because of broken power cords or bad adapters.
Remove All External Peripherals
Funny thing – cables plugged into the machine might block startup. Unplug them first
- Sticks of memory plug into ports. Outside boxes store heaps of files. Tiny cards slip into slots
- .Few choices here: HDMI works fine, yet VGA still shows up sometimes. Then again, DisplayPort handles things differently compared to the other.s
- SD cards
- Docking stations and hubs
Start by turning the laptop on without anything plugged in. Should it start up normally, then probably a device you attached earlier is causing trouble.
Hard Reset (Power Cycle)
A jolt left inside the motherboard might stop it from turning on. Try a full power drain if your laptop won’t wake up.
Steps for Hard Reset:
- Fully power off the machine. Turn it off entirely. Let the screen go dark. Wait until all lights fade. Ensure nothing runs inside.
- Far from the outlet, unplug the charger. If it comes out easily, take the battery away.
- Start by holding down the power button. Wait anywhere from half a minute to a full minute before letting go.
- Start by plugging in the charger, then touch the power button. The machine wakes once it feels electricity again.
A good number of Lenovo laptops start working right again once you follow these steps.
Model-Specific Hardware Fixes
Use the Lenovo Emergency Reset (Novo Button)
A tiny hole built into many current Lenovo notebooks serves as the Novo button. This feature helps users access system recovery tools without needing extra software.
Procedure:
- Switch the laptop off.
- Start by using a paperclip or pin on the Novo button – press and keep it down for about 10 to 15 seconds.
- Let go, then try turning it on.
Sometimes a flicker inside wakes things up again when screens go dark, or machines spin without progress. A small shift here might kick-start frozen signals that refuse to move on their own.
Remove and Reseat RAM
When RAM sticks aren’t seated properly or are damaged, the system might refuse to boot.
Steps:
- Start by switching the device off. Take away the lower panel once it is safe to do so.
- Pull out every piece of memory, slow and steady. One by one, lift them free from their slots.
- A soft snap means it’s seated right. Push every piece in deep till you hear that sound.
- Firmly shut the lid before switching the machine on.
Finding trouble starting up now and then? Try taking out the memory sticks, then putting them back in. Sometimes that small move clears the glitch. A fresh connection can wake things up when the system hesitates. It might look too simple, yet it often works just fine.
BIOS and Firmware Solutions
Enter BIOS / UEFI
When the laptop turns on, yet Windows does not start up,
- Start tapping F1, F2, or Delete fast right when you hit the power switch.
- Inside BIOS, look at the boot order. Should you need to, reset things to factory state. One step at a time keeps confusion low.
Firmware glitches during startup? A BIOS reset might clear things up when settings go sideways. Sometimes, wrong boot orders cause trouble – this step could straighten that out.
Update BIOS
For laptops that boot inconsistently:
- Head over to Lenovo’s support page tailored to your exact device.
- Start by grabbing the newest BIOS version online. Next step – put it onto your system carefully. The process finishes when the installation completes properly.
Firmware hiccups at boot? A BIOS refresh often stops those hiccups from returning. Not magic – just code tuned behind the scenes.
Troubleshooting Black Screen or Display Failures
Should the laptop turn on with a black screen showing up instead
- A Screen outside the laptop links through HDMI sometimes. Or try a different cable called VGA if needed instead.
- Pressing Fn along with F7 changes the screen. Some models might need a different button instead of F7. Check what works for your device. The exact key varies by machine type.
Diagnosis:
- A screen lit up outside means the problem lives inside – maybe the display, a wire, or a power supply failed. When an extra monitor runs fine, blame shifts within.
- Flickering screen? Could point to faulty memory, mainboard issues, or graphics card failure.
A screen outside the laptop helps spot problems tied to visuals while keeping the device closed. Though small, it plays a big role when troubleshooting what you see. Closing the lid does not stop progress if another monitor is connected. One way to test graphics trouble shows up here – without needing to dig into hardware.
Advanced Troubleshooting
CMOS Battery Reset
Firmware hiccups at boot? Try swapping the small silver battery on the motherboard. Sometimes that clears the glitch – no extra tools needed. A fresh power source often wakes up stuck settings.
Steps:
- Start by turning the machine off. Unhook it from the wall socket next. Disconnect power completely before moving forward.
- Finding the edge, lift the lower panel upward slowly.
- Start by taking out the CMOS battery gently. Wait somewhere between five and ten minutes before continuing. A short pause here makes a difference.
- Start by sliding the battery back into place before trying to start the device.
Handling the inside parts? Make sure you’re at ease with that – and took steps against static. Otherwise, better wait.
Diagnosing Motherboard Problems
When nothing fixes it, maybe the motherboard is the issue. Check for:
- Burnt or scorched smells
- Swollen or leaking capacitors
- Continuous beep codes during startup
A technician you trust might be best here. Or try a shop approved by Lenovo instead.
Quick Fix Summary Table
| Symptom | Likely Cause | Recommended Fix |
| No lights | Faulty adapter or outlet | Verify power source |
| Power LED on, no boot | Power logic glitch | Hard reset + Novo button reset |
| Blank screen | RAM or display failure | External monitor test |
| Boot loop | Firmware or RAM | BIOS reset + RAM reseat |
Additional Tips for Lenovo Startup Issues
- Always use Original Lenovo adapters for charging
- When fixing issues, losing info can happen unless copies exist from before. Start fresh each time, only if earlier versions sit safely somewhere else. Trouble often strikes without warning, so save what matters ahead of problems.
- Clean power ports to remove dust and debris.
- Clean power ports to remove dust and debris.
Mending things comes later; fixing them before they break happens first
Pros & Cons of DIY Fixes for Lenovo Power Problems
Advantages:
- Fewer bills when you skip the repair shop. Costs drop by handling fixes yourself instead of hiring help
- Quick identification of the root cause
- Sometimes fixes what goes wrong when starting up. Often handles typical problems without extra steps. Gets things running again, usually on the first try
Disadvantages:
- Opening the device might cancel coverage. Messing inside could mean losing protection. Tampering with parts often ends warranty benefits. If internal pieces get touched, support may stop. Adjusting what’s inside tends to break terms. Changing hardware usually removes safety nets.
- A few steps forward might mean a stumble later. Messing with the CMOS could leave things worse. Tugging out memory sticks and putting them back isn’t always safe. Some fixes tend to open new problems. A tweak today may bring a crash tomorrow
- Failing equipment often needs an expert site
FAQs
A: Perform a hard reset, check RAM, and try the Novo button reset.
A: Yes — reseating RAM, resetting BIOS, or performing a CMOS battery reset usually resolves boot loops.
A: Look for continuous beep codes, absence of lights, burnt smell, or visible physical damage. Seek professional help.
A: Intermittent startup issues often resolve with a BIOS update, which can prevent recurring firmware boot failures.
A: Only if you are confident in handling laptop hardware and have anti-static measures. Otherwise, contact a professional.
Conclusion
A dead Lenovo laptop might just need a power fix, though corrupted firmware could be pulling the strings behind the scenes. Begin by checking the charger, yet skip straight to a forced restart if nothing shows on screen. Pressing the NovoButton often reveals hidden boot options when regular startup fails. Sometimes BIOS getstangled, sotestingRAM sticks one at a time brings clarity slowly. Resetting the CMOS battery feels odd, but it clears digital clutter left behind after crashes.
Start slow. Genuine Lenovo parts make a difference – stick with them. Data matters most; keep it safe before anything else. When things get tricky, step back. Experts handle what you cannot see. Hardware demands care, nothing rushed. Diagnosis works best when done piece by piece. Patience shows up in results, not promises.