Introduction
Before giving away, selling, or reusing your Dell Laptop, makesurethe hard drive is properly wiped. Just removing files or using basic formatting won’t cut it – data can still be pulled back with certain software.How to securely erase a Dell laptop’s hard drive. By 2026, solid methods will be available that fully clear storage on both spinning drives and flash-based ones inside Dell models. These approaches ensure personal information stays gone for good.
Each technique has been tested, works reliably, and fits different user needs without complicated steps. Safety comes first when handling sensitive data, so skipping shortcuts matters. The tools recommended here leave nothing behind, whether dealing with older HDDs or modern SSDs in Dell machines. Following these practices keeps private details out of reach permanently.
This guide fits anyone starting just as much as someone chasing deeper tech knowledge. Because of clear steps and thorough breakdowns, handling tough tasks becomes easier. Clear comparisons sit alongside expert tips to build real understanding. After going through each part, wiping data securely feels less like guesswork. Sensitive information stays gone because recovery stops being possible.
Why Simple Deletion Is NOT Secure
Many people think trashing files or wiping a drive erases everything – the truth is, it usually does not. The system just clears the map to the file, leaving bits behind. Hidden pieces stay put until something else overwrites them. Clever tools pull fragments back without much effort. Only thorough cleaning truly hides what was there. Real removal needs more than a quick delete.
Common Missteps:
| Action | Data Recoverable? | Secure? |
| Delete Files | Yes | Not Secure |
| Quick Format | Yes | Not Secure |
| Full Format (HDD) | Hard | Better, but not ideal for SSD |
| BIOS Secure Erase | No | Secure |
| Certified Wipe Tool | No | Secure |
Key Takeaways:
- Finding the lost bits? They stick around even after you hit delete. What vanishes is just the roadmap, not the files themselves. Gone is the link pointing to where they rest. The information sits there, quiet, unchanged, waiting.
- A sector stays untouched during quick formatting – only the directory tree gets wiped. What happens is the deletion of pointers, not data itself.
- A complete wipe at the firmware level removes data thoroughly, particularly vital with SSD storage. Though often overlooked, such deep cleaning ensures information cannot be recovered. Only when the drive’s controller handles erasure can you trust the result. Without this step, remnants linger even after regular formatting. True sanitation demands access below the operating system layer.
Here’s something worth remembering. Wipe your drive using BIOS secure erase instead of basic deletion. A clean install on Windows works too – just make sure it’s the full version. Third-party tools built for wiping can do the job better than standard methods. Skip shortcuts if you truly want data gone. Recovery chances drop close to zero when done right.
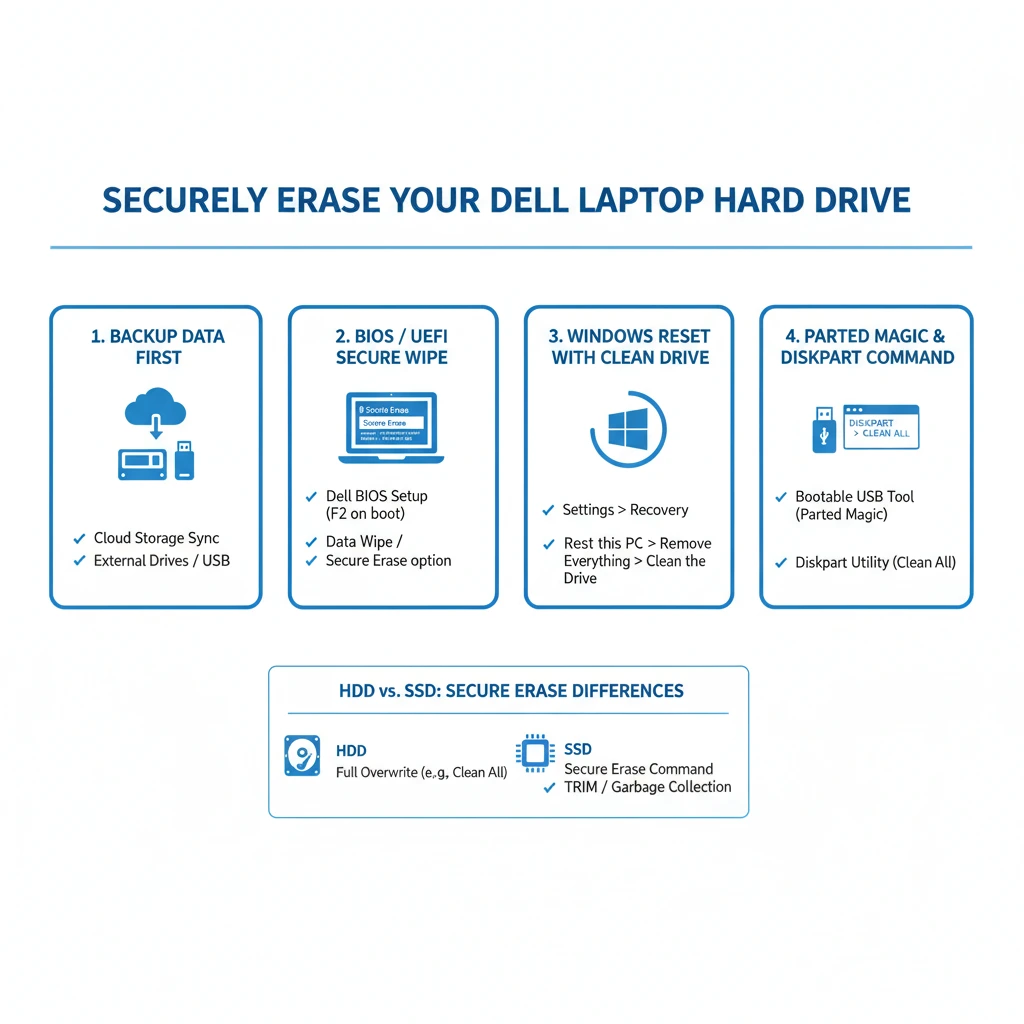
HDD vs SSD: Key Differences
Picking a proper way to erase data means knowing how HDDs differ from SSDs at their core. Getting that wrong might leave information behind, still recoverable.
| Feature | HDD (Hard Disk Drive) | SSD (Solid State Drive) |
| Technology | Magnetic platters | Flash memory cells |
| Data Storage | Physical sectors | Electronic memory blocks |
| Overwrite Requirement | Multiple passes recommended | Single firmware command |
| Wear Leveling | No | Yes — complicates overwrites |
| Best Secure Wipe Method | Overwrite / BIOS wipe | BIOS / Firmware secure erase |
Important Notes:
- Finding its home on rotating disks, an HDD holds information through magnetic traces – scrubbing each section again and again wipes it beyond recovery.
- Some SSDs store data on flash chips that spread writes evenly across cells – so certain areas might never get rewritten without specific firmware tools clearing them properly.
Here’s something worth knowing. Old-school overwrite tricks on SSDs can skip some sneaky leftover bits. Firmware-based wipe is what really clears everything out.
Backup Your Data First
Start by saving essential files somewhere safe before clearing your Dell machine. When data vanishes through secure wipe, it stays gone – no coming back after that point.
Important Data to Back Up
- Files like Word, yet also spreadsheets, along with PDFs, are stored privately.
- Frozen moments. Moving images flicker on screens. Clips blend sound with motion. Frames capture light and time. Digital snippets store memories across devices.
- Frozen moments. Moving images flicker on screens. Clips blend sound with motion. Frames capture light and time. Digital snippets store memories across devices.s
- Software license keys and activation codes
- A web browser saves your favorite sites. It keeps password details safe too. Signing in becomes quicker that way.
- Email archives or exported mailboxes
- Folders hold your progress, and account details float between devices. Saved moments travel across machines. Profiles follow you wherever you go. Data stays close, even when switching screens.
Recommended Backup Methods
- Cloud Storage: OneDrive, Google Drive, Dropbox
- External Drives: USB HDD / SSD, encrypted if sensitive
- Windows Backup Tools: Built-in File History or System Image Backup
- Windows Boot USB: For reinstalling Windows after secure erase
Check the backup first – open a few files to confirm they’re really there. Before moving on, make sure nothing critical is missing or damaged. Once the secure wipe runs, every bit of data vanishes without return.
Dell BIOS / UEFI Secure Wipe
Starting fresh sometimes means digging into the laptop’s core settings. Found inside many Dell models, a hidden wipe tool lives within the UEFI. Not relying on any software running above the machine helps it work without interference. Running deep, below Windows or any OS, makes this approach steady and thorough.
Why BIOS Secure Wipe Works
- Sends firmware-level secure erase commands to the drive
- A fresh start happens when every bit vanishes. Data fragments disappear without a trace. Stored sections get wiped clean. Nothing remains behind. Total clearance takes effect instantly
- Faster than wiping data, losing the key makes files unreadable overnight. Inside self-encrypting SSDs, that flip erases access without touching the bits themselves
- When data vanishes like that, no tool can pull it back. Even powerful recovery methods fail. Gone means gone – no trace remains anywhere. Nothing digs it up after this point. Once erased this way, it stays lost forever
Step-by-Step Guide
- Fully power off your Dell laptop. Turn it off entirely when done using. Let the screen go dark before walking away.
- Flick the switch, then tap F2 over and over till you hit BIOS setup.
- Head over to the section called Data Wipe – sometimes it’s labeled Secure Erase, depending on your device. This name might shift a bit based on the model you’re using.
- Start by picking the destination disk, whether it is an older hard drive or a faster solid-state one.
- Fresh start – clear everything once approved. Go ahead when ready. Erase begins after confirmation.
Watch out – older Dell versions sometimes show options such as Internal Drive Wipe instead of similar terms. Screen prompts will guide you step by step. Stick close to what appears in front of you.
A single click might erase everything – screens change depending on the machine. Some let you check the serial right there, making sure it’s done.
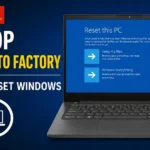
Windows 10 / 11 Reset with Clean Drive
When someone needs to wipe their system while setting up Windows again, the reset feature inside works just fine. Starting fresh? That built-in tool handles both cleaning and reloading without extra steps.
When to Use
- A fresh installation of Windows is desired
- Avoiding third-party tools
- Moderate security requirements
Step-by-Step Instructions
- Open Settings → Update & Security → Recovery
- Click Reset this PC
- Select Remove Everything
- Choose Clean Data / Clean Drive
- Confirm and start the reset
Important Notes:
- Finding safety matters most when wiping data. Instead of Quick Reset, go straight to Clean Drive. A faster method skips deep cleanup – risk stays high. Only a full clean removes traces completely. Pick the option that digs deeper every time.
- Fresh start under Windows wipes out old bits first, filling those spots with new code instead – this shift blocks most attempts to pull back what was there before. Later stages swap in updated pieces while clearing traces, closing doors on retrieval each step of the way.
Parted Magic & Third-Party Tools (Advanced)
A disk utility called Parted Magic handles deep cleaning on hard disks and solid-state storage safely. When powered up directly from USB or CD, it works without installing anything first. Experts trust it because mistakes rarely happen once it starts running. Its design focuses only on wiping data completely, nothing more.
Why Use Parted Magic
- Supports HDDs and SSDs
- Uses industry-standard ATA Secure Erase commands
- Finding tweaks beyond what BIOS allows becomes possible here. Control shifts into the user’s hands when settings go deeper. Tools inside adjust details most missed at first glance.
- Fits well with earlier laptop models
How to Use Parted Magic
- Download the Parted Magic ISO
- Create a bootable USB using Rufus or BalenaEtcher
- Boot the Dell laptop from the USB drive
- Open the Erase Disk utility
- Start by picking the drive you want to erase. Then make sure the cleaning process is locked in safely.y
While Parted Magic costs money, it packs features like disk diagnostics, performance tests, or data rescue options – useful when you work hands-on with hardware. A solid pick if your job demands deeper system control.
Command Prompt Secure Erase
A hidden feature inside Windows goes by the name diskpart. Though it looks plain, it handles complete hard drive cleaning well. This tool works quietly yet gets the job done thoroughly.
Steps — Diskpart Clean All
- Open Command Prompt as Administrator
- Enter:
diskpart
list disk
select disk X
clean all - Replace X with the number of the target drive
How It Works:
- A fresh sweep across each segment fills them with zeroes, leaving traces nearly impossible to trace back. What once was readable now hides in plain sight, overwritten completely. Every corner gets touched, ensuring nothing stays behind. Recovery becomes a distant thought after such thorough rewriting.
Warnings:
- Irreversible
- Selecting the wrong disk will erase the wrong drive
- Not recommended for SSDs due to wear leveling
Advanced Techniques: Encryption + Key Erasure
Start by encrypting the entire drive if you want top protection – this matters most with solid state drives. Then, proceed with wiping data safely after that step finishes.
Why This Works
- Encryption scrambles all stored data
- Destroying the encryption key makes the data impossible to read
- Footprint gone. Tools meant to dig deep come up empty. Data stays out of reach, no matter the effort. Recovery attempts fail every single time
Steps
- Enable BitLocker (Windows) or any full disk encryption
- Perform BIOS Secure Erase or Parted Magic wipe
- The encryption key is destroyed, leaving residual data useless
Highly secure
Prevents forensic recovery
Best suited when handling private data or running a company
Validation: How to Confirm Your Drive Is Truly Erased
A clean slate on your Dell means checking twice – what’s gone should stay gone. Every trace must disappear, nothing lingers behind.
Validation Methods
- Start by grabbing a tool like Recuva – it pulls back lost files fast. Another path? Try TestDisk when the problem runs deeper into the system
- Tools made by makers: Samsung offers Magician. Meanwhile, drives from Intel come with their own utility box. Each helps check performance, update software, keep the drive health cleacleartart up the system from the drive. Look around for leftover sections or operating systems still hanging on.
When the system shows no files, yet spots partitions, wiping probably didn’t finish. Sometimes empty drives mean cleanup worked – other times, hidden structures remain. A lack of visible data, plus partitio,e hints at full removal. Hidden layers might still linger even if nothing appears. True erasure often leaves zero traces behind.
Pros & Cons of Each Method
| Method | Pros | Cons |
| BIOS / UEFI Secure Erase | Fast, firmware-level, works on HDD/SSD | Not available on older laptops |
| Windows Reset Clean Drive | Easy, reinstall Windows | Slightly slower, moderate security for SSD |
| Parted Magic | Highly reliable, supports all drives | Paid software requires a bootable USB |
| Diskpart Clean All | Free, complete control | Slow, risky if the wrong disk is selected |
FAQ
A: Yes — only if you choose Clean Data / Clean Drive. Quick reset is not secure.
A: Yes — it resets internal tables and can restore some write performance.
A: No — using BIOS secure erase or Parted Magic properly makes data unrecoverable
A: Yes — any storage device with sensitive data should be securely erased.
A: BIOS secure erase or manufacturer tools handle hidden blocks better than normal overwrites.
A: No — but it adds an extra layer of protection. Encrypt first, then erase if maximum security is needed.
Conclusion
Wiping a Dell laptop’s hard drive properly goes beyond routine tech work – it guards sensitive details you’d rather keep private. Instead of counting on regular delete actions or basic format tricks, stronger steps are needed since those leave traces behind. For either spinning Drives or flash storage, options show up like Secure Erase through BIOS settings, full clean resets via Windows tools, or deeper software paths using something like Parted Magic. Each pick changes how solid the wipe turns out, recovery becoming nearly impossible when done right. The choice leans on what machine you own and how tight security must be, yet ignoring thorough cleanup always brings danger closer than wise to allow.
A clean drive means one less thing to worry about. Follow each method carefully, check what’s been done, and then know for certain that no files can return. Selling your old Dell, sending it off to be recycled, or using it again – each situation benefits from that added moment spent wiping everything fully. Sensitive details stay gone when erasure is thorough. That quiet certainty? It comes from knowing every bit was addressed.